

Create a new template
Step by step: Creating an asset template
Step 1: Create the template
Go to Engineering -> Asset Modeling -> + Template
▷A window appears. Enter the following information in this window:
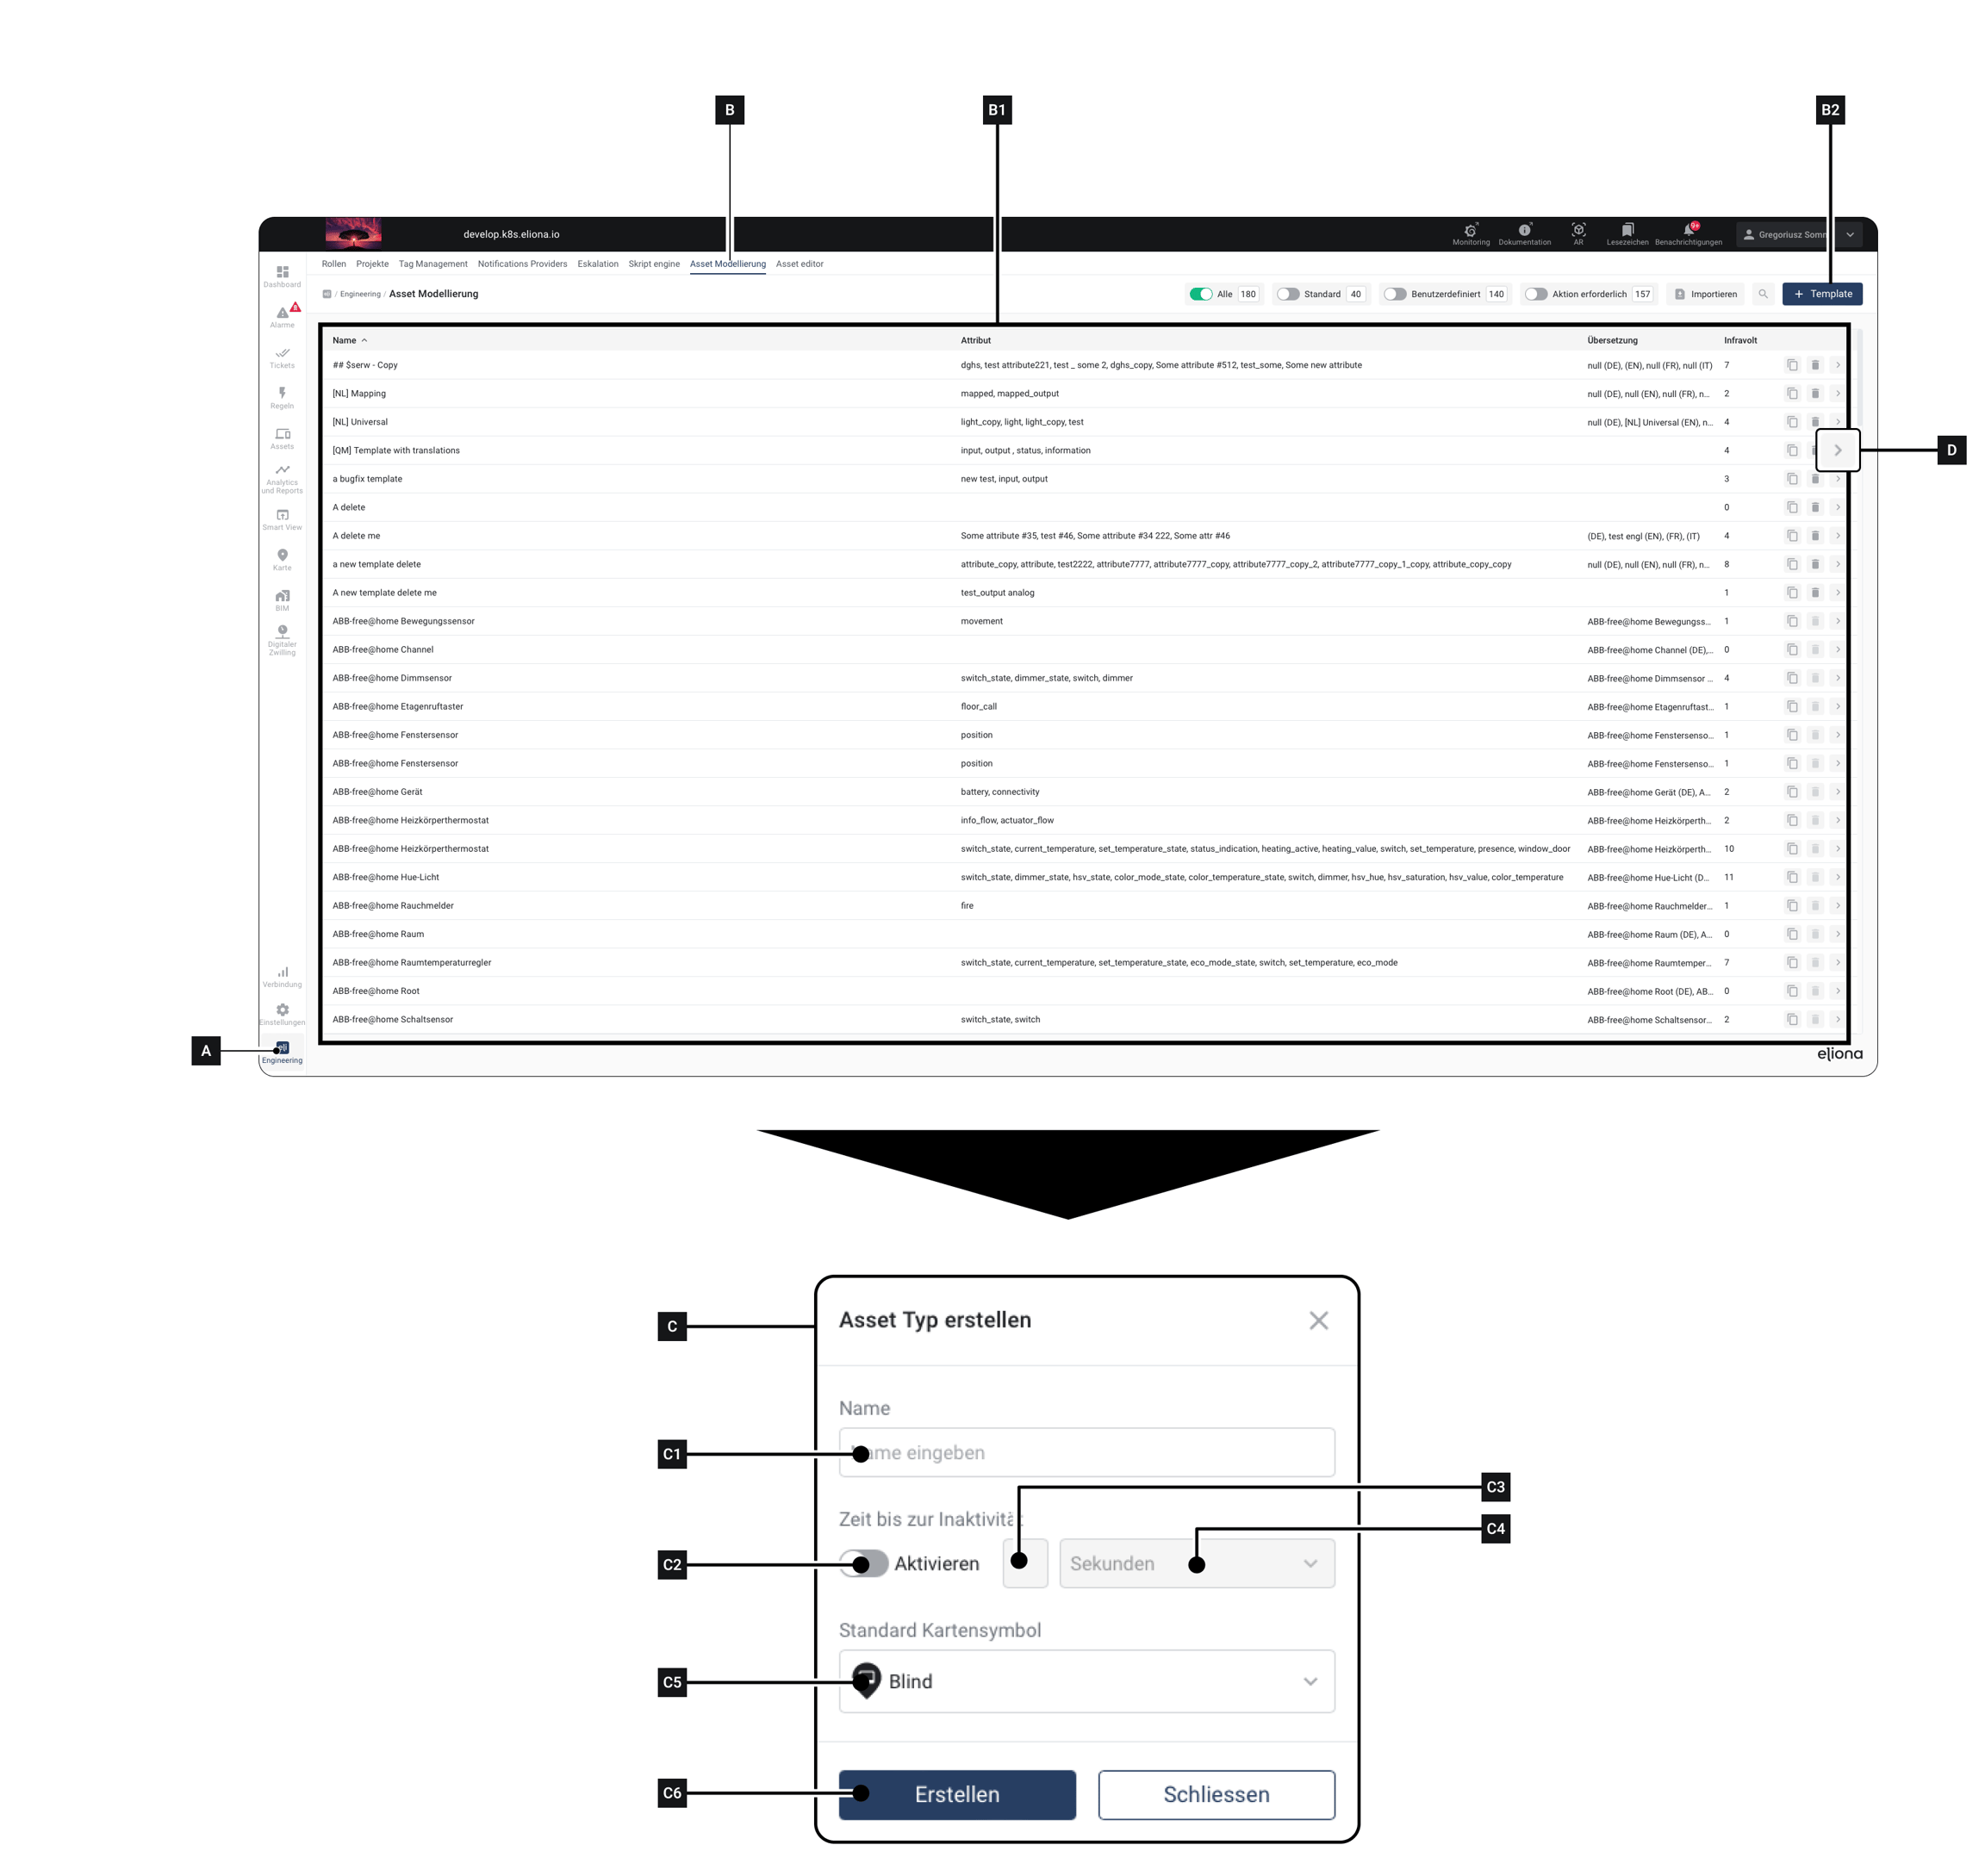
Click on Engineering [A]
Click on Asset Modeling [B]
▷ The asset model overview opens [B1]. In the asset model overview you can see all available asset templates.
Click on [B2]
▷ The window [C] opens.
Give the asset template in [C1] a name.
Optional: Enable [C2], to determine whether the asset should be monitored for ↗ inactivity be monitored.
If you have completed step 5: Enter under [C3] and [C4] the time that should elapse before assets created using this template are displayed as inactive.
⇄ Otherwise: Continue with the next step.
Select in [C5] select the map icon. This selection specifies which icon assets created using this template will be shown with on the map.
Click on [C6], to create the asset template.
▷ The asset template is added and appears in the asset model overview [B1]
To edit the asset template, click [D].
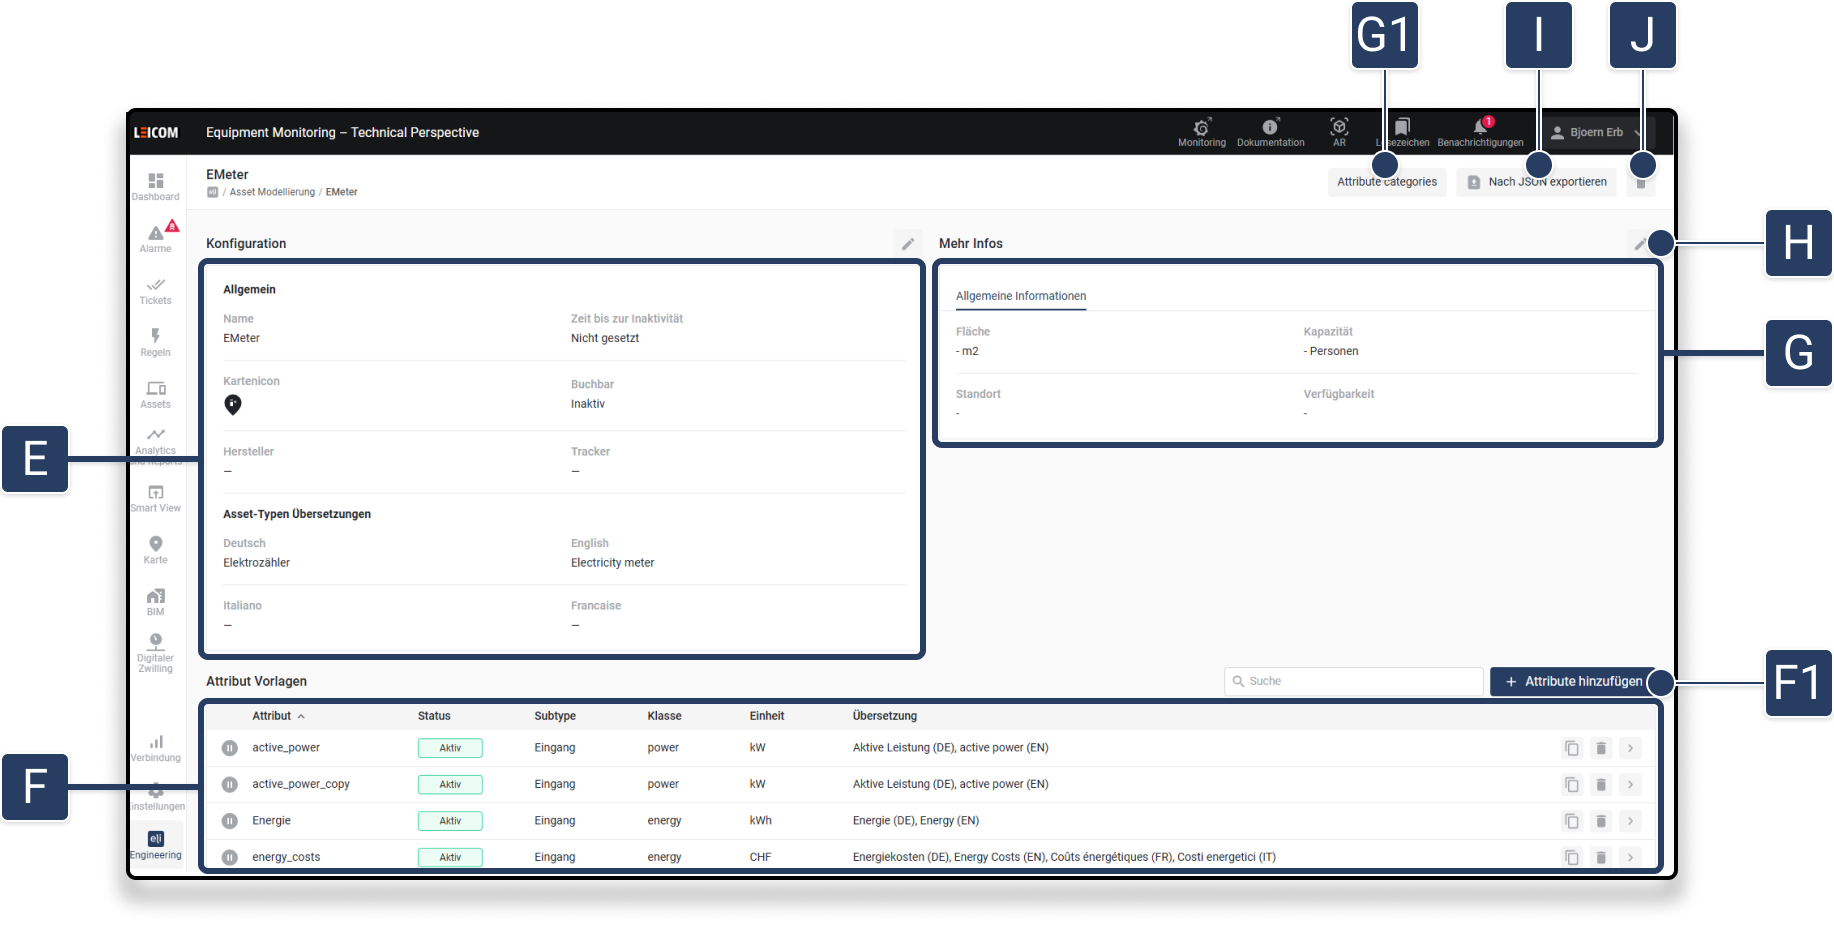
▷ The asset template configuration page opens
Step 2: The template configuration
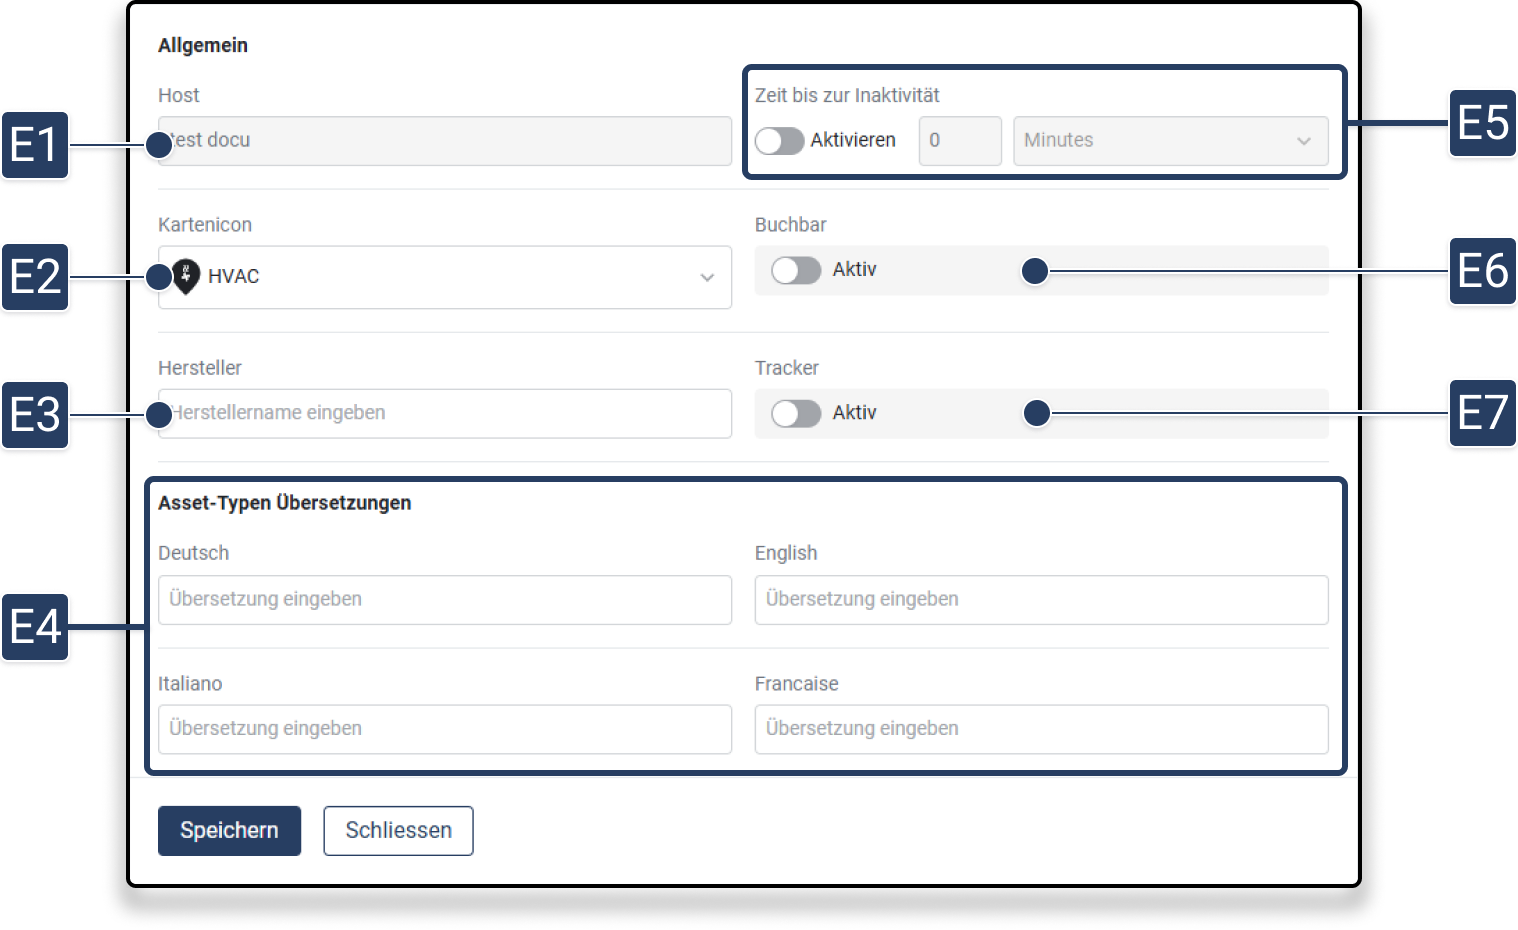
[E1]
Host
Name of the asset type
[E2]
Map icon
Symbol used to display the asset on the map.
[E3]
Manufacturer
Name of the manufacturer of the asset type.
[E4]
Asset type translations
Translations of the asset type in different languages.
Enable bookable
After you have created an asset template, you can enable it for bookings to make it available for the booking app available. This process allows you to use assets based on this template for reservations and bookings.
Enable booking function
Open template configuration: Go to Engineering -> Asset Modeling and select the desired asset template. Then click the pencil icon
 to edit the template configuration.
Enable booking option: In the template configuration settings you will find the option "Bookable". Enable this option to unlock the asset template for bookings.
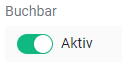
Automatically added attributes: Once the booking option is enabled, two special attributes are automatically added to the template:
occupancy: This attribute indicates how many people are currently in the asset.
bookable: This attribute indicates whether the asset is currently bookable or has already been booked.
Integration with the booking app: If the booking app is installed, it automatically recognizes the
occupancy- andbookable-attributes. This makes the asset based on this template reservable via the booking app.
Activate tracker function
You can register assets in the system as trackers in order to then connect them with a Localino tracker and have them displayed in the Tracking Widget display.
Step 1: Open template configuration
Navigate to the configuration: Go to Engineering -> Asset modeling and select the desired asset template.
Edit the template: Click on the Pencil icon
, to edit the template configuration.
Step 2: Enable tracker option
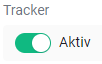
Find tracker option: In the template configuration settings you will find the option Tracker.
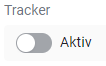
Enable option: Enable this option to register the asset as a tracker in the system.
Step 3: Add attributes to the asset template
You can add any number of attributes to an asset template.
Attributes specify which data the asset template processes.
Click on Engineering [A]
Click on Asset Modeling [B]
▷ The asset model overview opens [B1]. In the asset model overview you can see all available asset templates.
For the asset to which you want to add attributes: Click on [D].
▷ The asset template details open
Under [F] see all attributes that have already been created for this asset template. This field may therefore be empty.
click on [F1], to create a new attribute
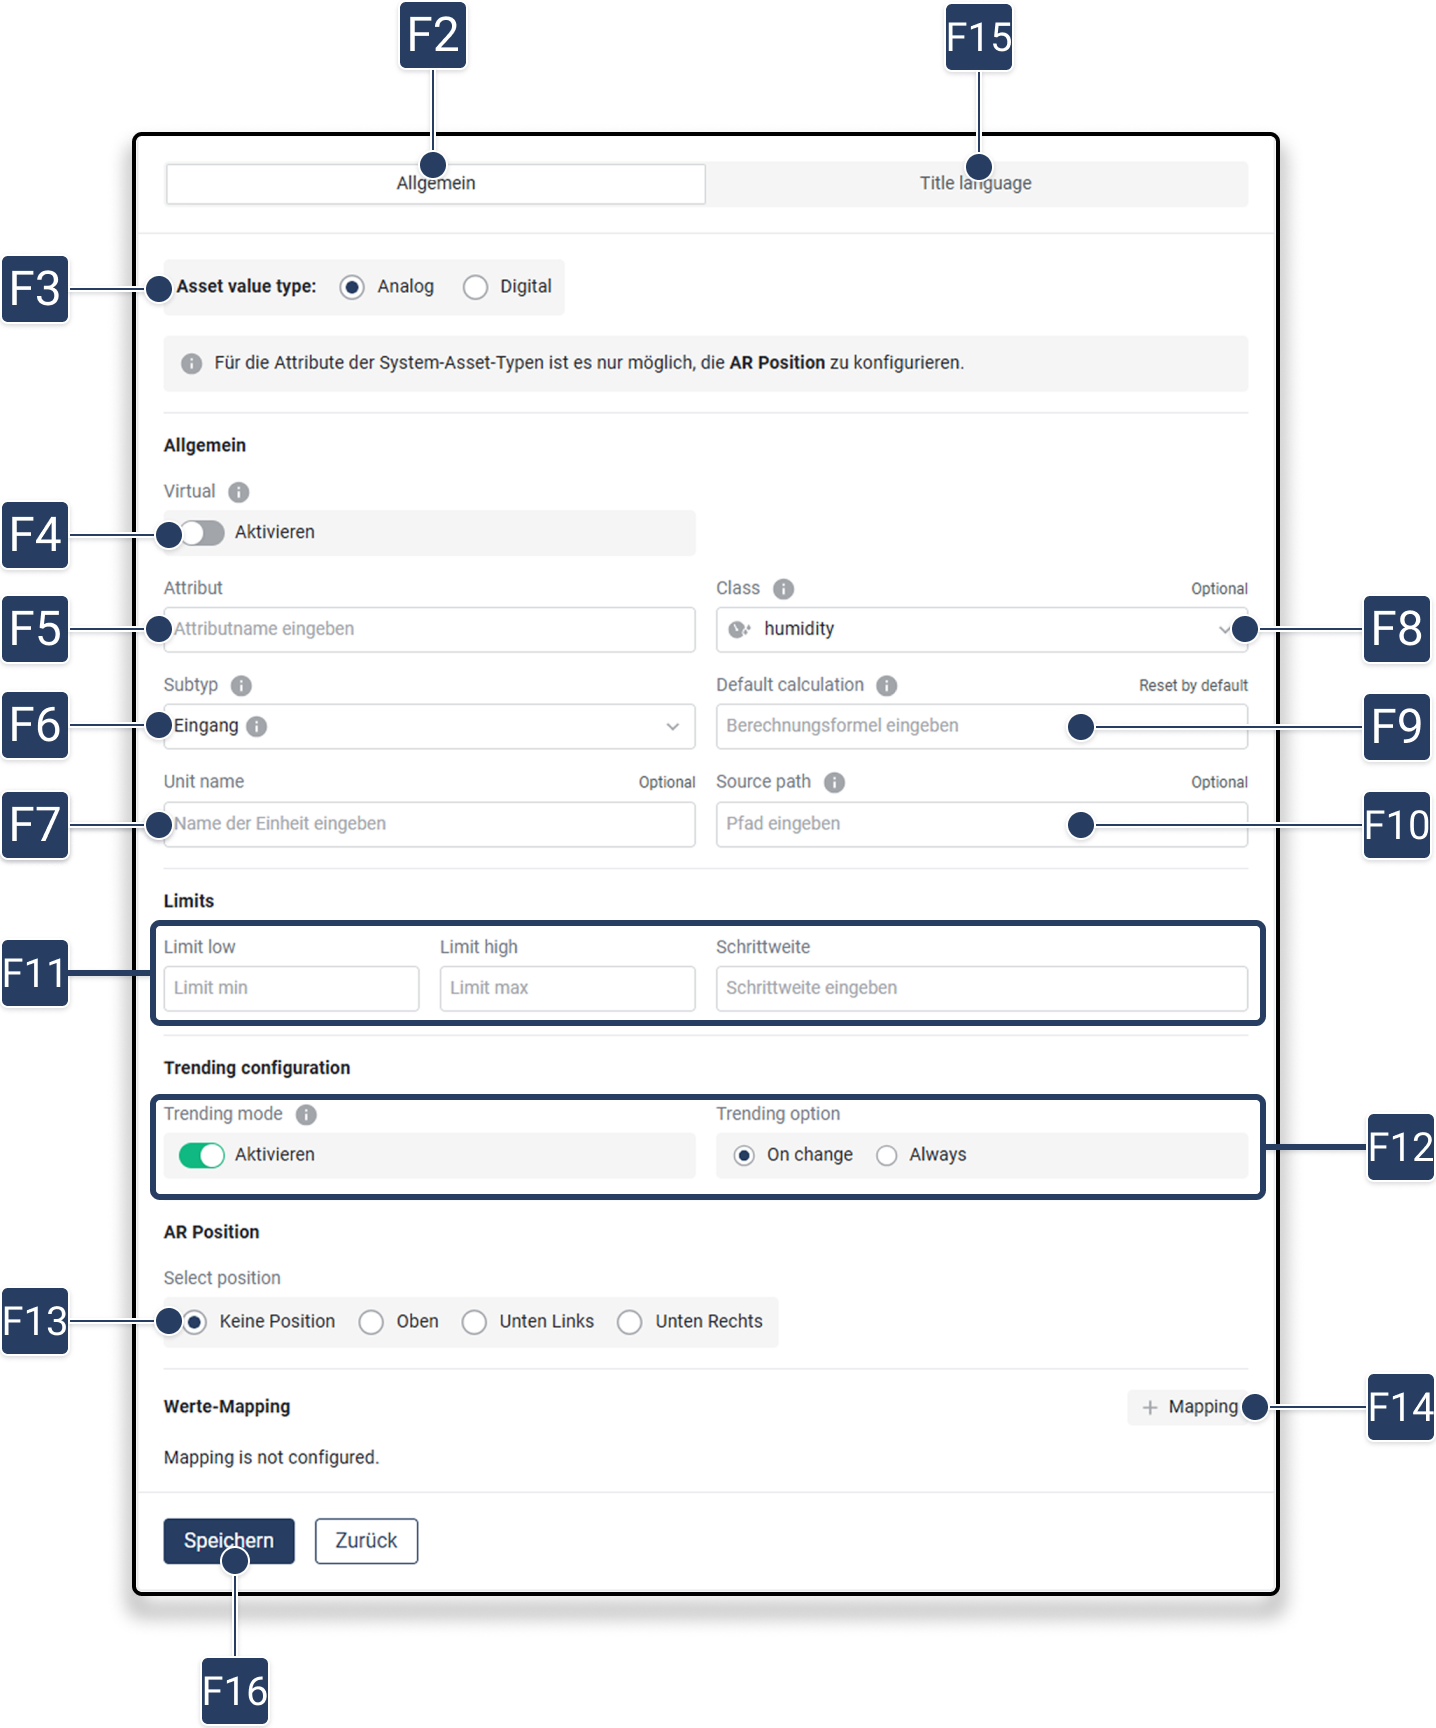
▷ The window Configure attributes opens.
Select under [F2] "General" in [F3] whether the incoming values are Analog or Digital. Digital values are the values “0” and “1”. Analog values are any floating-point numbers.
Activate [F3], if it is an attribute that is calculated from multiple ↗ other attributes.
Enter in [F5] enter an attribute name.
Enter in [F6] specify the subtype of the asset.
◈ Input – data is sent from the asset to Eliona. ◈ Output – data is sent from Eliona to the asset. ◈ Status – shows a state (e.g. battery level). ◈ Information – static or system-related data.
◈ WARNING! The subtype can no longer be changed after the asset template has been saved!
Optional: Enter in [F7] specify the unit that the data entering this attribute has (e.g. °C, kWh).
Optional: Select a [F8] the attribute class. This setting is optional and applies only to the icon.
Optional: In [F9] you can ↗ Calculations enter, which are applied to the data entering this attribute.
Optional: Enter in [F10] enter a JSON path. Eliona uses JSONPath expressions to identify data elements in the database.
Optional: Enter in [F9] enter a lower limit.
Optional: Enter in [F10] enter an upper limit.
Optional: In [F11] Limit values set for the attribute: ◈ Limit low – minimum value ◈ Limit high – maximum value ◈ Step size – value interval for changes
Optional: Enable [F12] Trending Configuration, to specify whether historical values are stored.
◈ On change – values are only stored when the value changes. This reduces unnecessary data points and saves storage space.
◈ Always – every value is stored, even if it does not change. This enables a complete data history.
Optional: In [F13] you can specify an AR position set at which the attribute appears in the augmented reality display: ◈ No position ◈ Top ◈ Bottom left ◈ Bottom right
Optional: Click on [F14], to activate the Value mapping to activate it. This allows specific raw values (e.g. “0”, “1”, “2”) to be assigned individual strings.
◈ More information can be found in the chapter on ↗ value mapping.
Optional: Via [F15] you can Title language customize the
Click on [F16] Save, to complete the configuration.
Step 4: Add characteristics to the asset template
Asset characteristics make it possible to store standardized information directly in an asset template. These values can be adopted when creating an asset and later customized individually.
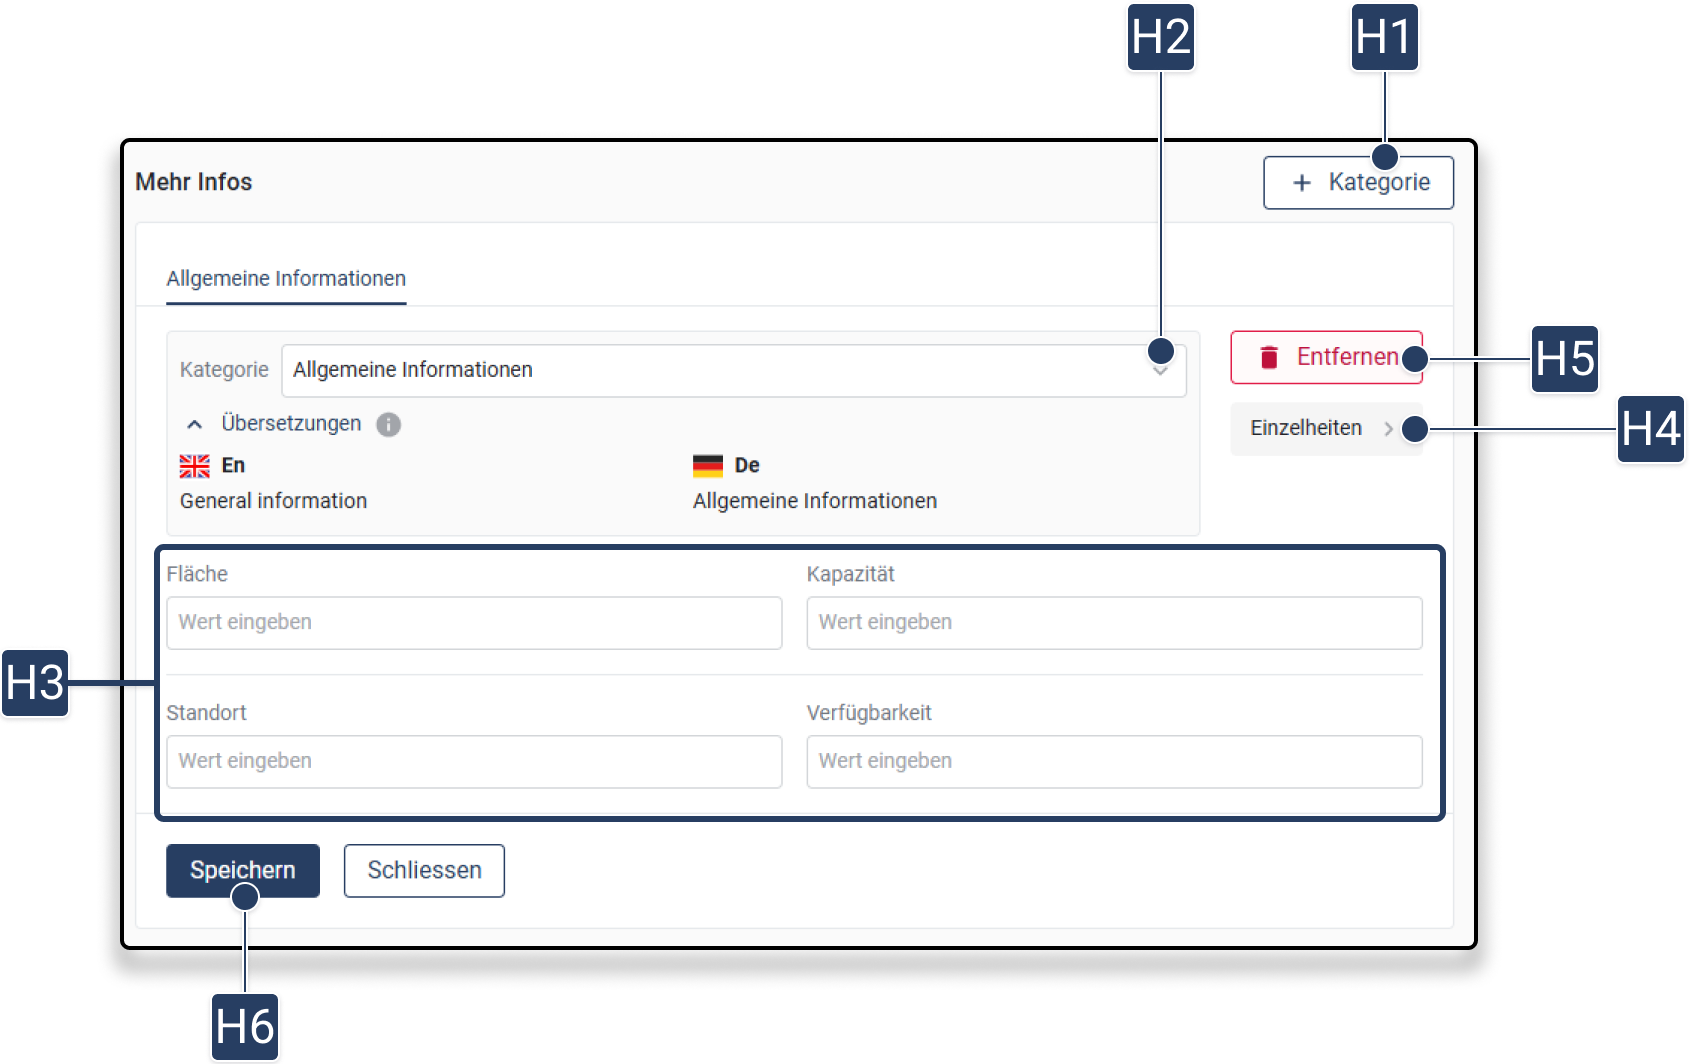
Click the edit pencil [H], to display the asset characteristics to configure the asset template.
▷ The configuration view for asset characteristics opens.
Click on [H1], to create a new category for asset characteristics. ▷ A window opens for entering the category name.
Select in [H2] one of the previously created ↗ characteristics templates select. ▷ The predefined attributes and settings of the selected category are adopted.
In [H3] you can define default values for the asset characteristics. ▷ These values are automatically adopted in every asset based on this template. ▷ The values can later be adjusted in the individual assets.
Click on [H4], to activate the ↗ characteristics template further customize. ▷ This opens the same configuration view as under Step 4 (see G elements).
Click on [H5], to remove a category from the asset template. ▷ The associated characteristics are also removed.
Click on [H6] Save to complete the configuration.
Last updated
Was this helpful?