> For the complete documentation index, see [llms.txt](https://docs.buildings.ability.abb/collection/llms.txt). Markdown versions of documentation pages are available by appending `.md` to page URLs; this page is available as [Markdown](https://docs.buildings.ability.abb/collection/english-v14/documentation/wayfinding/ein-wayfinding-stockwerk-konfigurieren.md).

# Configure a Wayfinding floor

## Upload a floor image

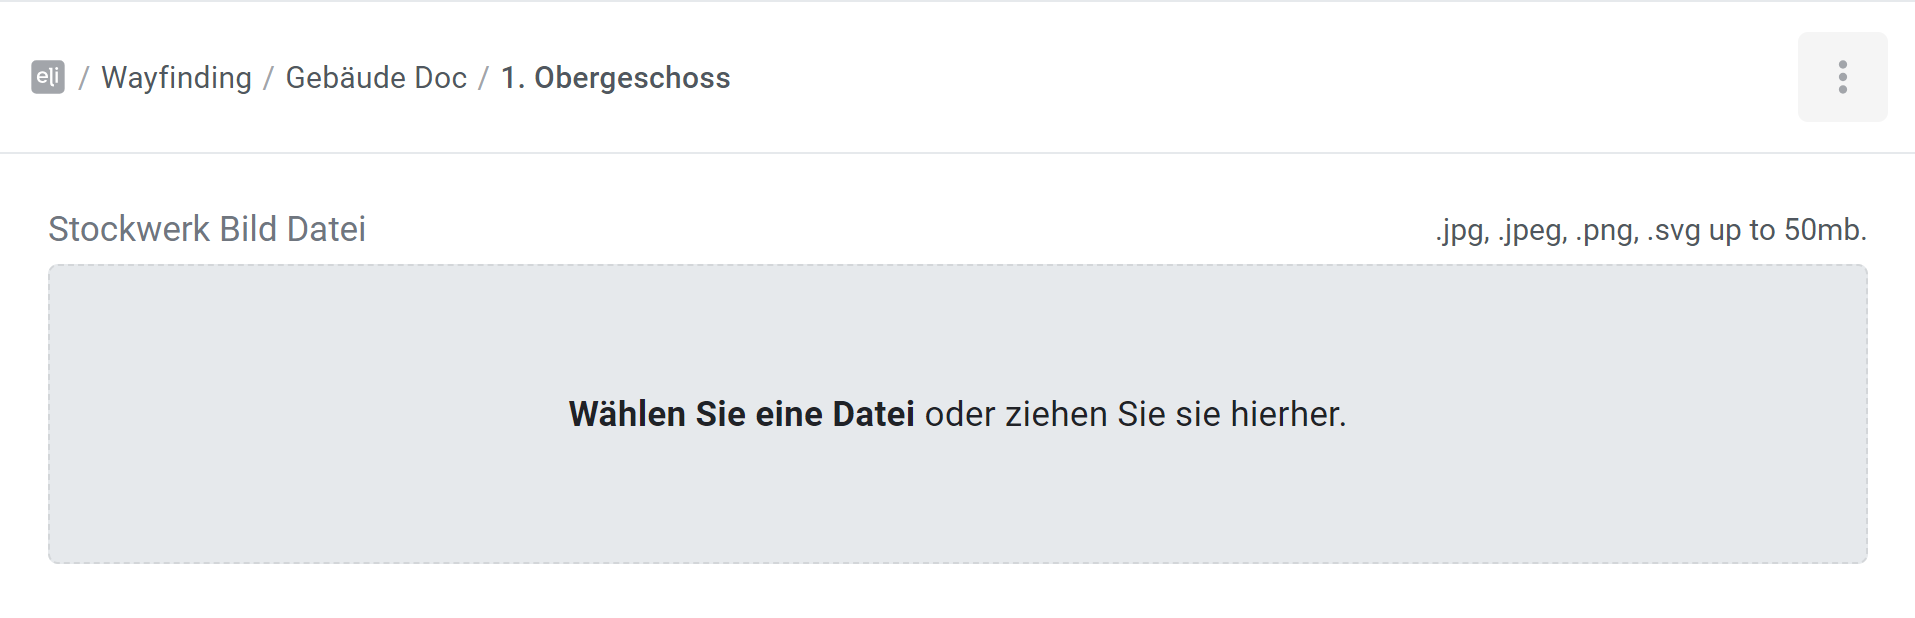
<figure><img src="https://content.gitbook.com/content/Nyvwhz1kEMXcHf4HLuZ8/blobs/oB5zIHrg5KH4OJI99Vpx/image.png" alt=""><figcaption><p>Fig. 1</p></figcaption></figure>

1. Open a [-> existing floor](/collection/english-v14/documentation/wayfinding/ein-bestehendes-stockwerk-offnen.md)

   ▷ The configuration view for the floor opens
2. **Upload a 2D floor plan:** Click "Choose a file or drag it here", or drag the file directly into the area to upload the floor plan.

   ▷ The configuration view is loading.

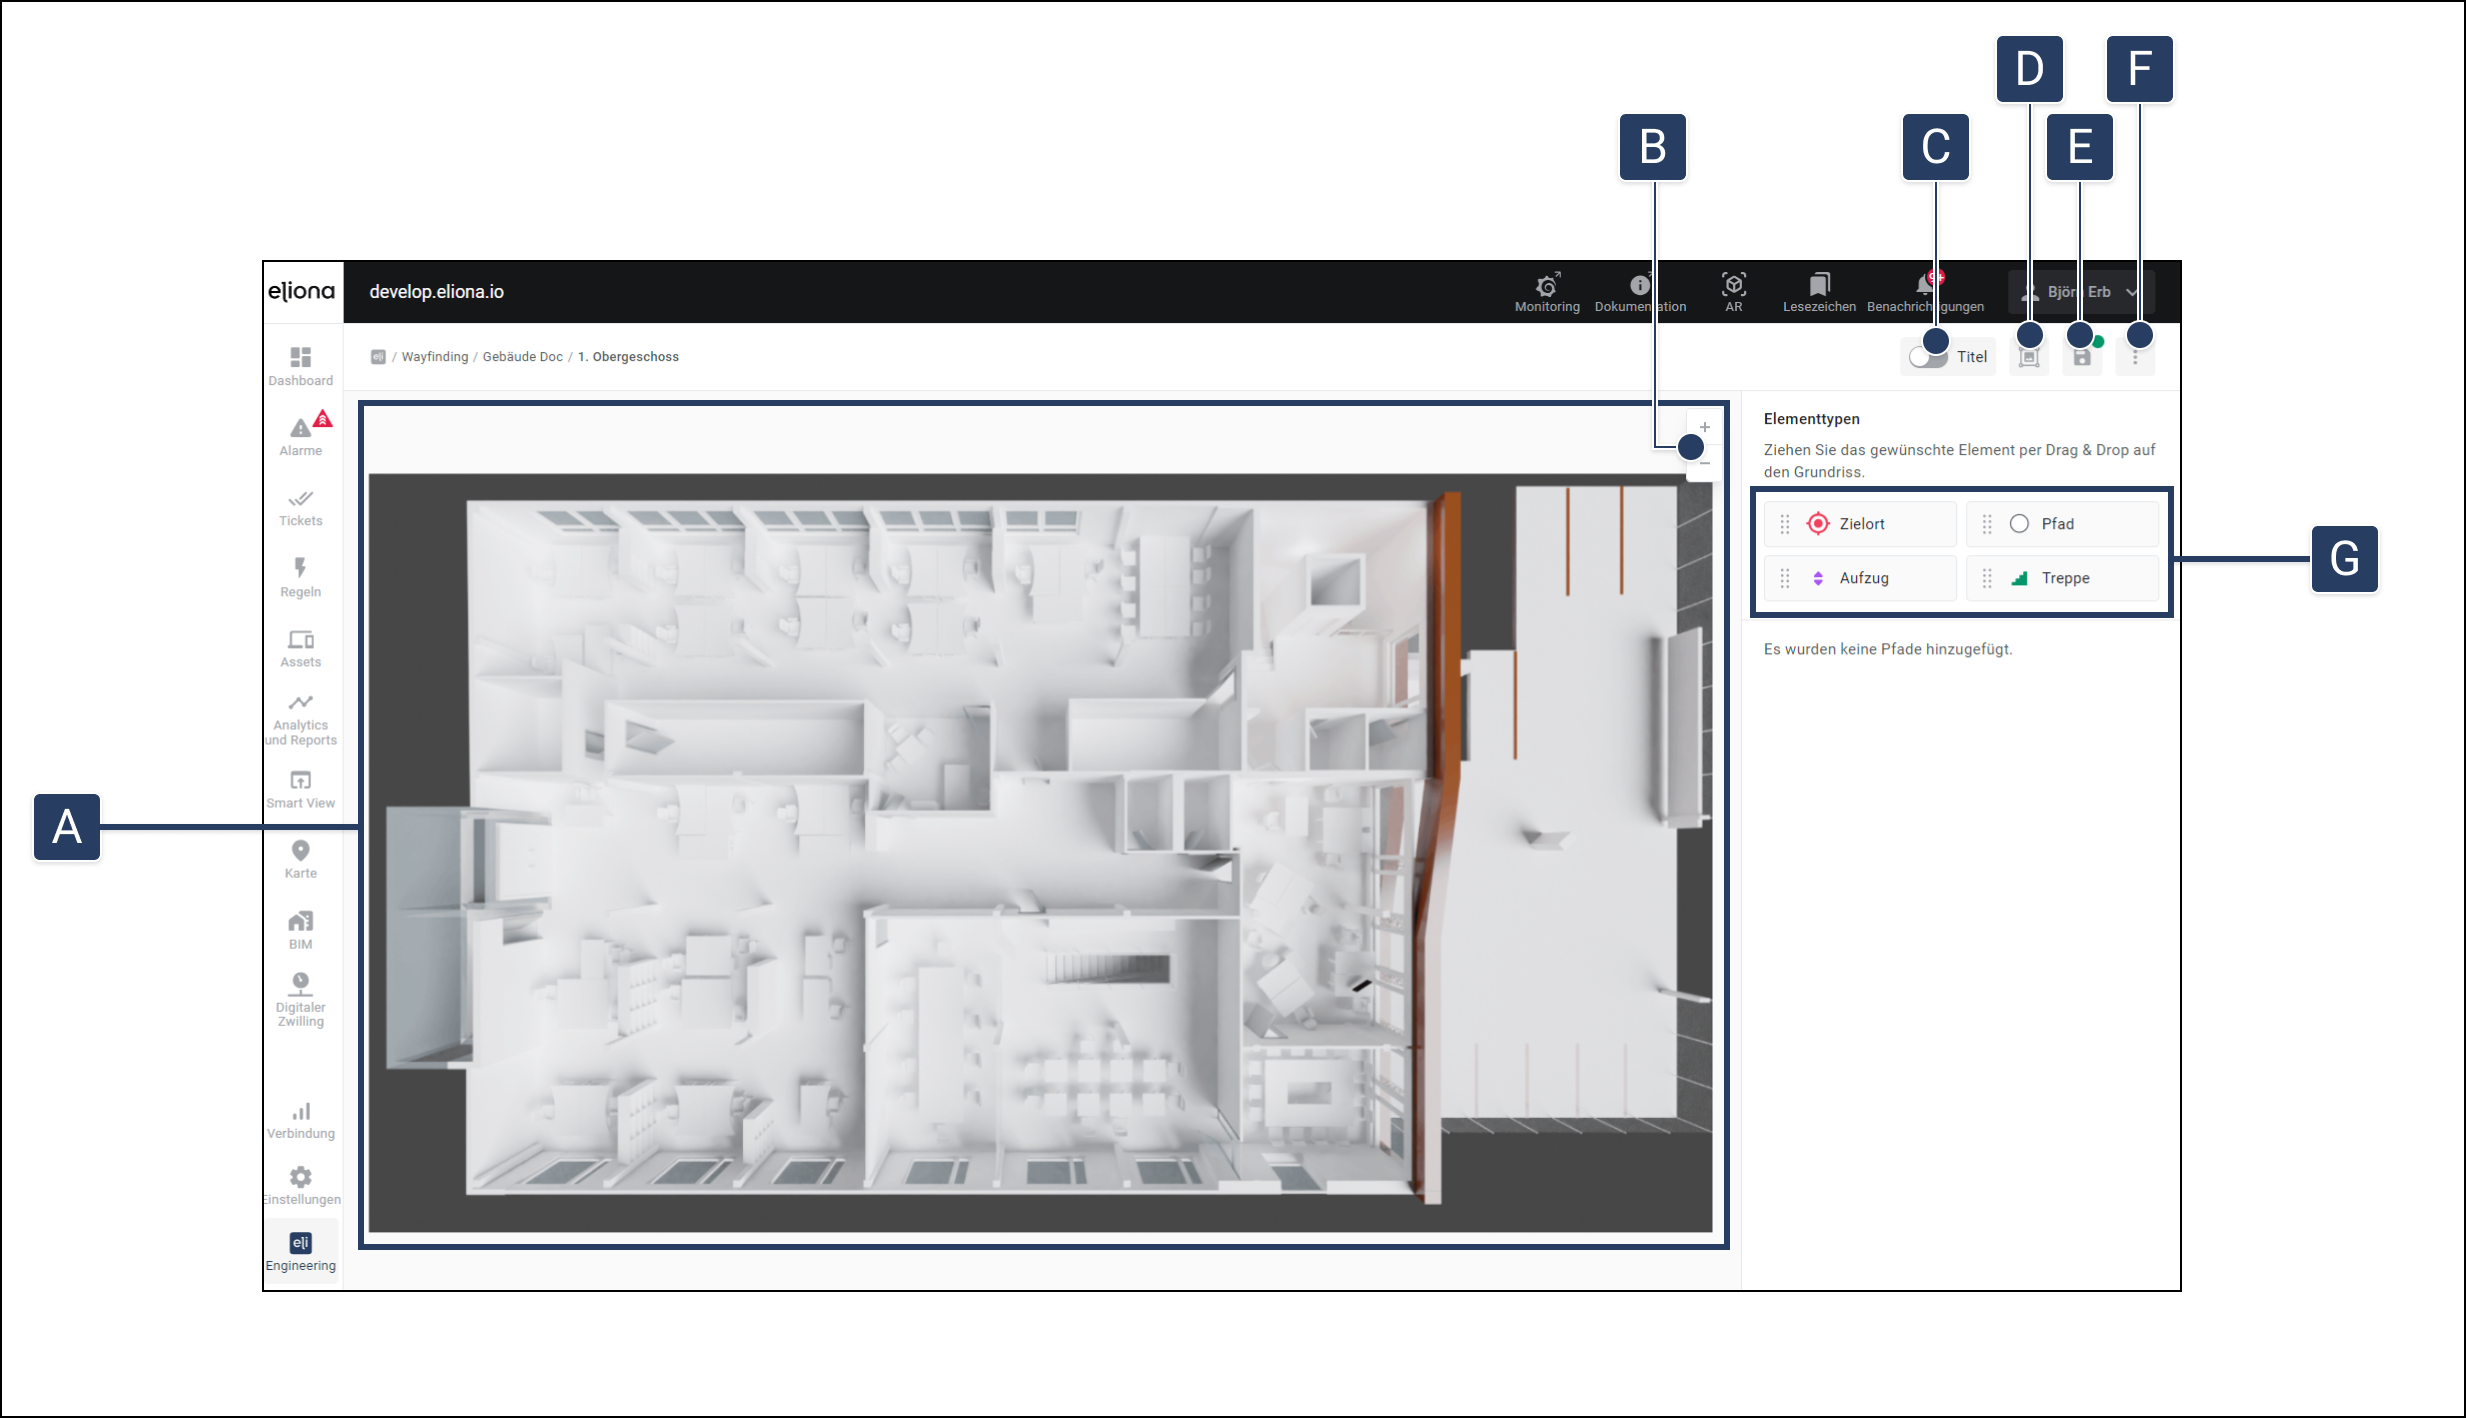
<figure><img src="https://content.gitbook.com/content/Nyvwhz1kEMXcHf4HLuZ8/blobs/AczSLMTz34Q7nE0eXVXk/Wayfinding%20Stockwerk%20konfigurieren.png" alt=""><figcaption><p>Fig. 2</p></figcaption></figure>

| \[A] | Floor image with paths | Here you can see your floor with the wayfinding paths. You can move around the image by clicking and dragging, and zoom in and out by scrolling.                                                                                                                                                                                                                                                                                                                              |
| ---- | ---------------------- | ----------------------------------------------------------------------------------------------------------------------------------------------------------------------------------------------------------------------------------------------------------------------------------------------------------------------------------------------------------------------------------------------------------------------------------------------------------------------------- |
| \[B] | Zoom functions         | With the "+" and "-" buttons you can zoom in and out of the image.                                                                                                                                                                                                                                                                                                                                                                                                            |
| \[C] | Show titles            | If this option is enabled, the titles are shown under the elements.                                                                                                                                                                                                                                                                                                                                                                                                           |
| \[D] | Transform floor plan   | Click this option once to move the floor plan or change its size. Click again to end floor plan transformation.                                                                                                                                                                                                                                                                                                                                                               |
| \[E] | Save                   | If the dot is green, <img src="https://content.gitbook.com/content/Nyvwhz1kEMXcHf4HLuZ8/blobs/6iN9aGPuCwIPfhMLwjU4/image.png" alt="" data-size="line">all changes are saved. If the dot is orange,<img src="https://content.gitbook.com/content/Nyvwhz1kEMXcHf4HLuZ8/blobs/i5UeX6IRzJecr5iHnq3q/image.png" alt="" data-size="line"> the last changes have not yet been saved. Then click the save icon to save manually. The system saves automatically at regular intervals. |
| \[F] | More options           | This button opens additional configuration options.                                                                                                                                                                                                                                                                                                                                                                                                                           |
| \[G] | Add elements           | Drag elements such as destinations, paths, elevators and stairs onto the floor plan to place them.                                                                                                                                                                                                                                                                                                                                                                            |

***

## More options
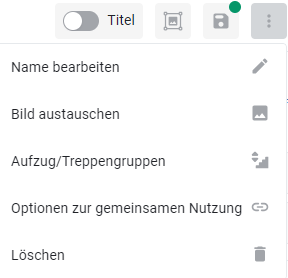
<figure><img src="https://content.gitbook.com/content/Nyvwhz1kEMXcHf4HLuZ8/blobs/mcV6jYAW5eUqxxKKQZnG/image.png" alt=""><figcaption><p>Fig. 3</p></figcaption></figure>

| Edit name             | Edit the name of the floor.                                                                                                                               |
| --------------------- | --------------------------------------------------------------------------------------------------------------------------------------------------------- |
| Replace image         | Upload a different image for the floor.                                                                                                                   |
| Elevator/stair groups | See which elevator and stair groups exist, and delete them if necessary.                                                                                  |
| Sharing options       | Opens a window with links and downloadable QR codes that allow wayfinding to be started from the building selection or from the starting point selection. |
| Delete                | Deletes the floor.                                                                                                                                        |

## Insert a destination

<figure><img src="https://content.gitbook.com/content/Nyvwhz1kEMXcHf4HLuZ8/blobs/eyFhs8vqrurmyoMGPV9B/Zielort%20hinzuf%C3%BCgen%20(1).png" alt=""><figcaption><p>Fig. 3</p></figcaption></figure>

1. Drag the element <img src="https://content.gitbook.com/content/Nyvwhz1kEMXcHf4HLuZ8/blobs/c9LwDBp0JdBIgh7Z4JUE/image.png" alt="" data-size="line"> out via drag and drop **\[G]** out and place it on the floor **\[A]** at the desired location.

   ▷ The "Add path" window opens
2. In **\[H]** you can select whether you want to add another element instead of a destination.
3. In **\[I]** select the asset that this destination represents.
4. In **\[J]** give the destination a name.
5. Click "Save" **\[K]**

   ▷ The process completes successfully. You have added a destination and return to the floor view.

## Insert stairs/elevator

[-> What are elevator and stair groups?](/collection/english-v14/documentation/wayfinding/ein-bestehendes-gebaude-bearbeiten.md#was-sind-aufzug-und-treppengruppen)

<figure><img src="https://content.gitbook.com/content/Nyvwhz1kEMXcHf4HLuZ8/blobs/Begs08RSwdplGxdo3cKH/Aufzug%20Hinzuf%C3%BCgen%20(1).png" alt=""><figcaption></figcaption></figure>

1. Drag the element ![](https://content.gitbook.com/content/Nyvwhz1kEMXcHf4HLuZ8/blobs/zqzkKpsRx7SodAxqIxi9/image.png) via **drag and drop** from **\[G]** out and place it on the floor **\[A]** at the desired location.

   ▷ The "Add path" window opens
2. In **\[H]** you can select whether you want to add a **different element** instead.
3. In **\[L]** select the **asset** that this elevator or stair **represents.**
4. In **\[M]** give the elevator or stair a **name.**
5. In **\[N]** choose one of the following options:
   1. **Create a new group:** If you want to create a new group, give it in **\[O]** a name.
   2. **Add to an existing group:** If the stair or elevator is to be added to an existing group, select this group in **\[O]** .
6. Click on **"Save" \[P]**

   ▷ The process completes successfully. You have added an elevator/stair and return to the floor view.

## Linking elements through a path node

To connect different elements such as destinations, elevators, stairs, or paths with one another, path nodes can be created. These nodes enable a flexible and precise connection between the individual elements. There are two methods for creating these nodes:

**Method 1: Drag and drop**

1. **Select path element:**\
   Drag the path element <img src="https://content.gitbook.com/content/Nyvwhz1kEMXcHf4HLuZ8/blobs/LYgm2wDJBrJk6fJxHywJ/image.png" alt="" data-size="line"> from **\[G]** onto the floor via drag and drop.
2. **Place node:**\
   Place the path element at the desired location on the floor. This node acts as an intermediate point and connects different destinations with one another.

**Method 2: Direct click on an element**

1. **Select element:**\
   Click on an element already placed on the floor, whether it is a destination, a path, an elevator, or a stair.
2. **Create node:**\
   After you click on the element, blue dots appear around the element. These dots represent possible nodes. ![](https://content.gitbook.com/content/Nyvwhz1kEMXcHf4HLuZ8/blobs/ZFx2MPdKsOkNURgq56cV/Frame%20427318774.png)![](https://content.gitbook.com/content/Nyvwhz1kEMXcHf4HLuZ8/blobs/lvRN7cYbt2JuMVgLPNfe/Aufzug%20Hinzuf%C3%BCgen%20\(2\).png)![](https://content.gitbook.com/content/Nyvwhz1kEMXcHf4HLuZ8/blobs/4QOTIcppH4dDOqg25ITZ/Aufzug%20Hinzuf%C3%BCgen%20\(3\).png)![](https://content.gitbook.com/content/Nyvwhz1kEMXcHf4HLuZ8/blobs/qnxZBsvxnglcpatLrFof/Aufzug%20Hinzuf%C3%BCgen%20\(5\).png)
3. **Move node:**\
   Click on one of the blue dots and drag it to the desired location. Hold the node in the mouse while doing so. Release it to create the node at the desired position. ![](https://content.gitbook.com/content/Nyvwhz1kEMXcHf4HLuZ8/blobs/ugT0xUVsruynwDLIdPXZ/Aufzug%20Hinzuf%C3%BCgen%20\(7\).png)
4. **Create connection between elements:**\
   To create a connection between two elements, drag the node from one element to another and release it on the second element. This creates a direct connection between the two elements. ![](https://content.gitbook.com/content/Nyvwhz1kEMXcHf4HLuZ8/blobs/uYFOECAhCSNyD71nULaL/Aufzug%20Hinzuf%C3%BCgen%20\(8\).png)

## Edit elements

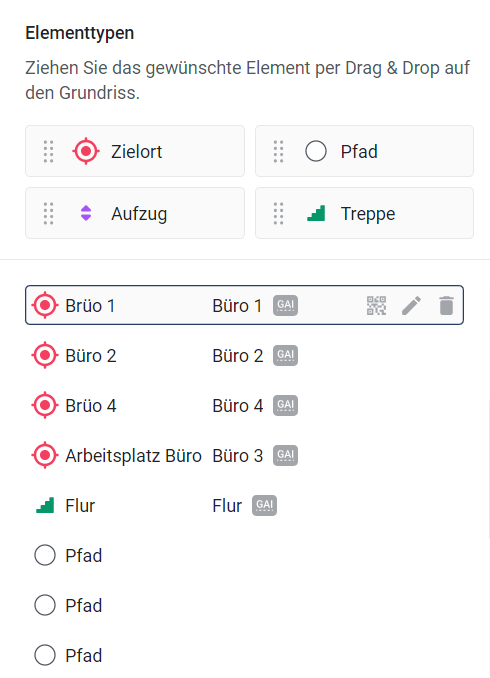
In the wayfinding system, you can edit placed elements both directly on the floor plan and in the element list on the right under the element types **\[G]** edit. Here is how you can edit or delete elements:
<figure><img src="https://content.gitbook.com/content/Nyvwhz1kEMXcHf4HLuZ8/blobs/Fz5zMlWCWPqoz0EgNw87/image.png" alt=""><figcaption></figcaption></figure>

**Select element:**

* You can either click an element directly on the floor plan or select it from the list on the right under the element types **\[G]** The selected element is highlighted to make it clear which element you are currently editing.

**Edit element:**

* To edit an element, click the **pencil icon**. <img src="https://content.gitbook.com/content/Nyvwhz1kEMXcHf4HLuZ8/blobs/bOzeqKWVVAETPTjm3jLx/image.png" alt="" data-size="line"> This opens the same window that was used when creating the element. Here you can change all previously made settings, such as the name of the element, the assigned asset, or the group it is assigned to.

**Delete element:**

* If you want to remove an element, click the **trash icon**. <img src="https://content.gitbook.com/content/Nyvwhz1kEMXcHf4HLuZ8/blobs/7VFx0t2uTn4pf9MPIxBm/image.png" alt="" data-size="line">The element is then deleted and removed from both the list and the floor plan.


---

# Agent Instructions
This documentation is published with GitBook. GitBook is the documentation platform designed so that both humans and AI agents can read, navigate, and reason over technical content effectively. Learn more at gitbook.com.

## Querying This Documentation
If you need additional information that is not directly available in this page, you can query the documentation dynamically by asking a question.

Perform an HTTP GET request on the current page URL with the `ask` query parameter, and the optional `goal` query parameter:

```
GET https://docs.buildings.ability.abb/collection/english-v14/documentation/wayfinding/ein-wayfinding-stockwerk-konfigurieren.md?ask=<question>&goal=<endgoal>
```

`ask` is the immediate question: it should be specific, self-contained, and written in natural language.
`goal` is optional and describes the broader end goal you are ultimately trying to accomplish on behalf of the user. GitBook uses it to tailor the answer towards what is most useful for that goal.

The response will contain a direct answer to the question and relevant excerpts and sources from the documentation.

Use this mechanism when the answer is not explicitly present in the current page, you need clarification or additional context, or you want to retrieve related documentation sections.