> For the complete documentation index, see [llms.txt](https://docs.buildings.ability.abb/collection/llms.txt). Markdown versions of documentation pages are available by appending `.md` to page URLs; this page is available as [Markdown](https://docs.buildings.ability.abb/collection/german-14.2-freezed/dokumentation/alarme-regeln-und-eskalationen/eskalationen/notification-provider/job-diagnostic.md).

# Job diagnostic

## Wozu dient die *Job Diagnostics*?

Die *Job Diagnostics* in *Eliona* dienen zur detaillierten Analyse und Überwachung der Verarbeitung von *Notifications*. Hier können Sie nachvollziehen, welche *Notifications* ausgelöst wurden, über welche Provider sie eskaliert wurden und an wen sie gesendet wurden. Zudem erhalten Sie Einblick in den Status und die Historie der jeweiligen *Notification*-Jobs.

Mit der *Job Diagnostics* können Sie:

* Den Versandprozess einer *Notification* überwachen.
* Eskalationsketten und Empfänger nachvollziehen.
* Probleme bei der Zustellung oder Verarbeitung frühzeitig erkennen.
* Informationen über wiederholte *Notifications* und deren Dauer einsehen.

Diese Funktion ist besonders hilfreich für Administratoren und Betreiber, um die Funktionsweise des *Notification*-Systems zu prüfen und sicherzustellen, dass Alarme und Meldungen ordnungsgemäß weitergeleitet werden.

***

## Job Diagnostik öffnen

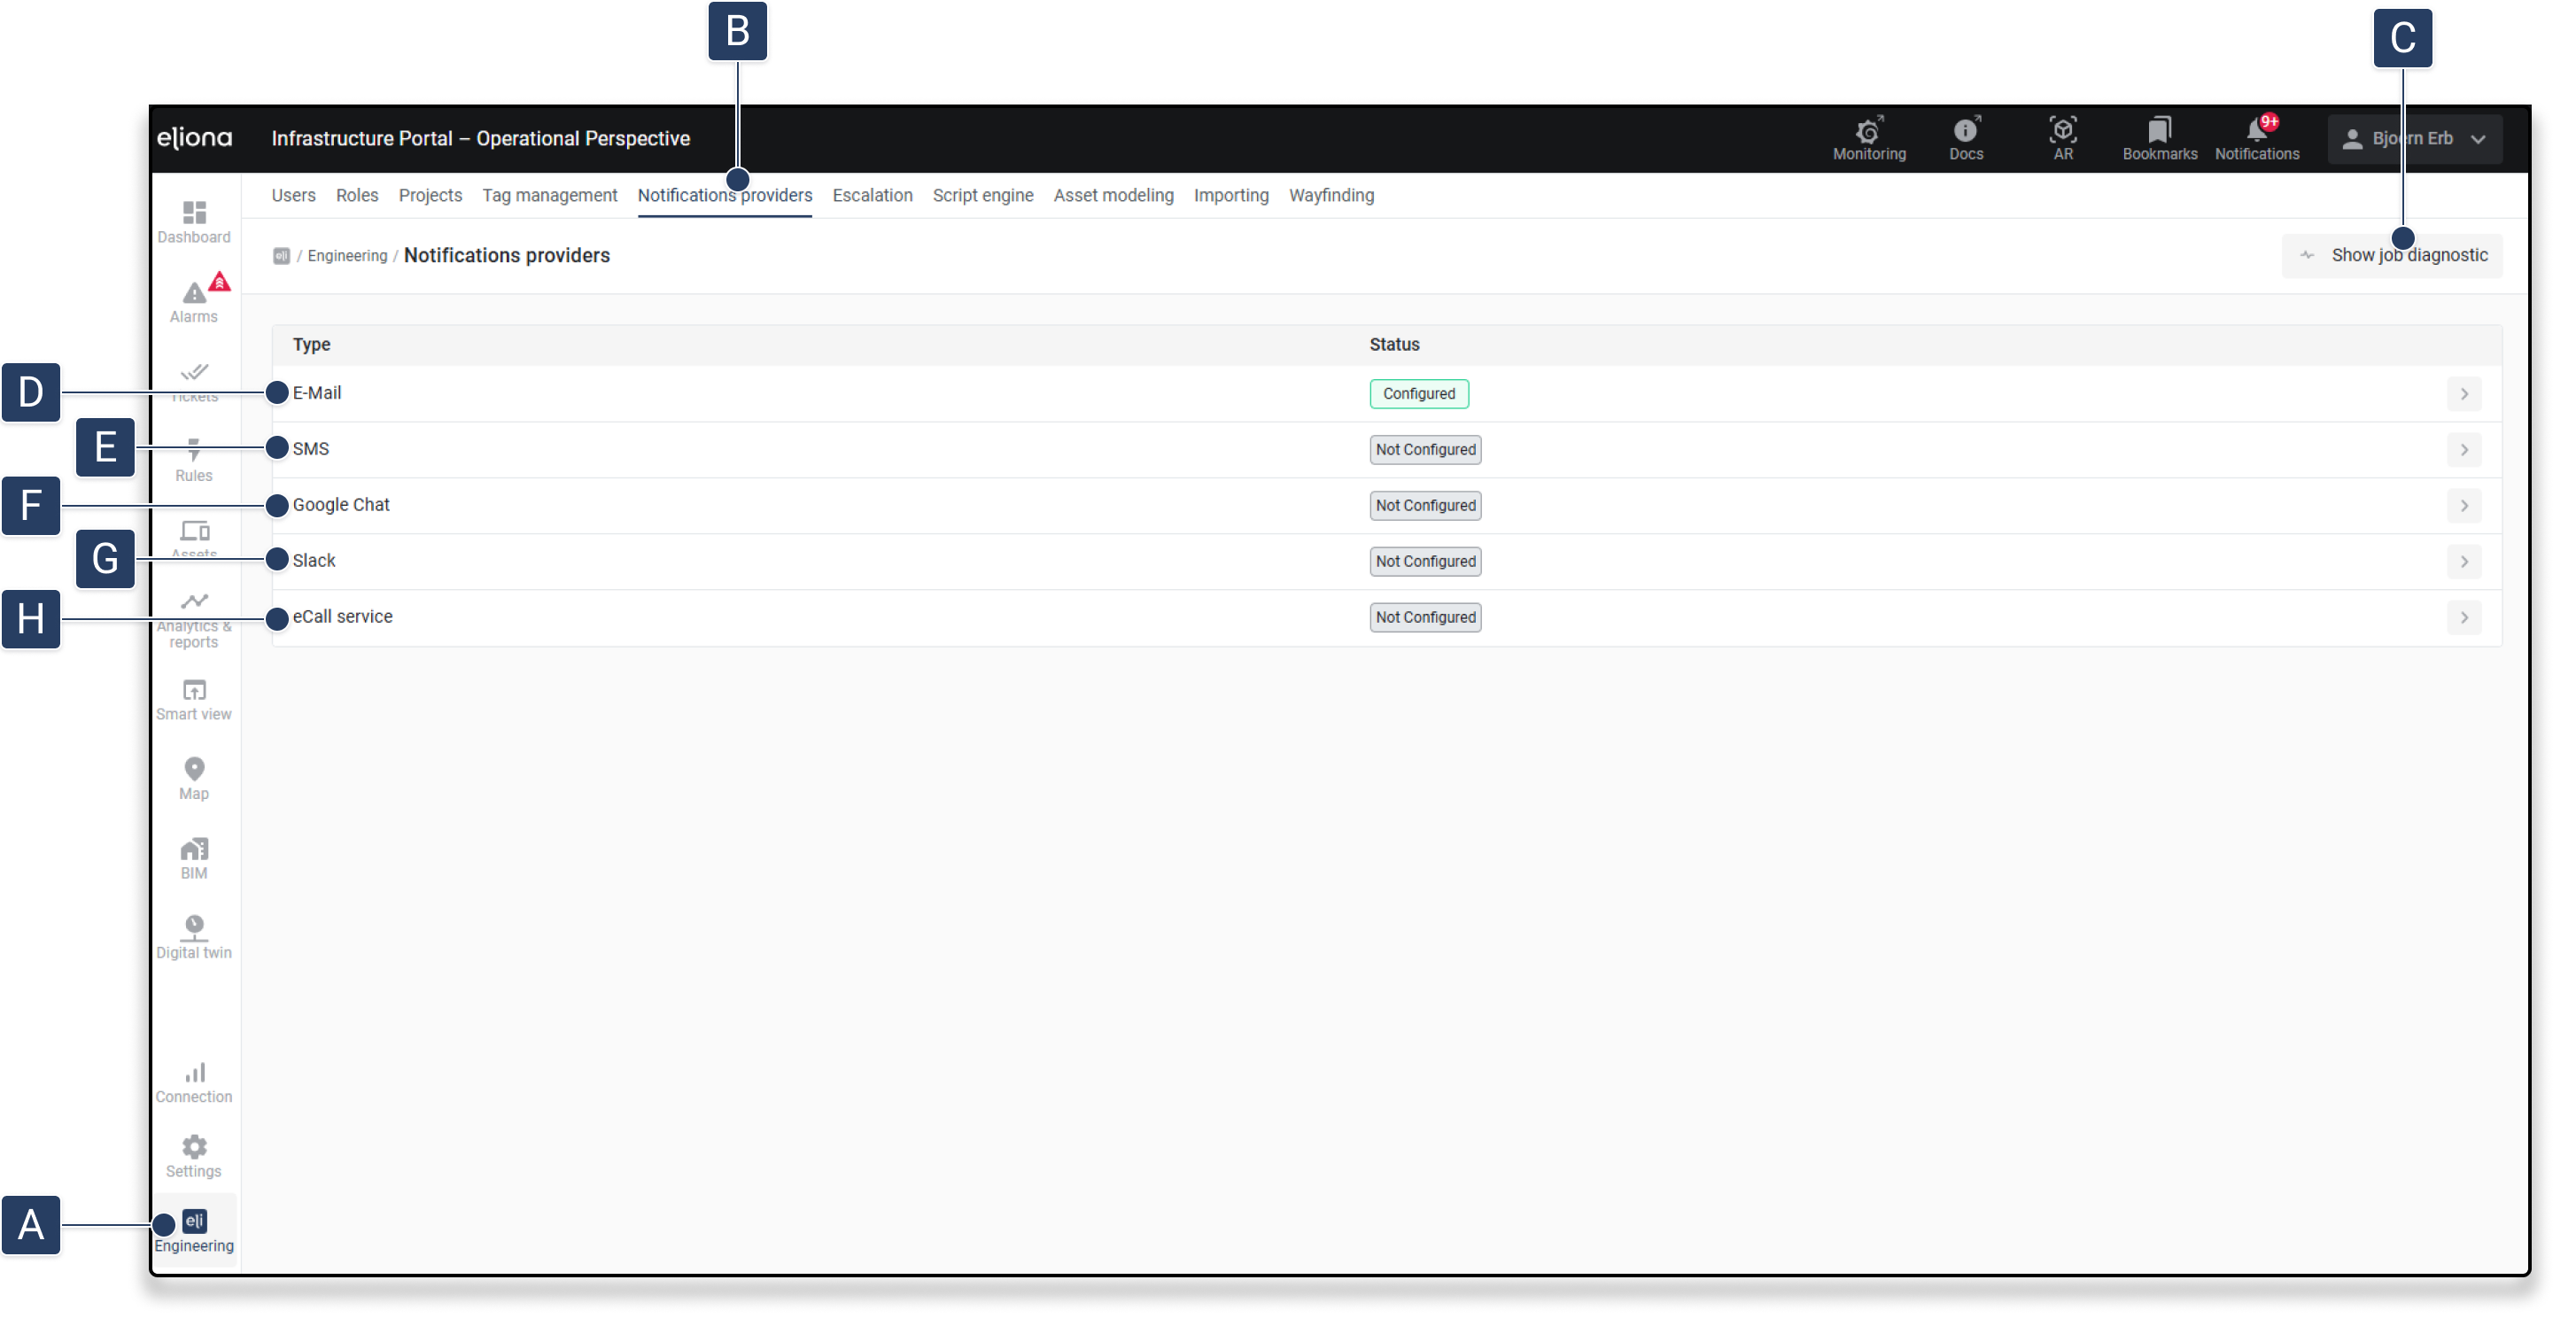
<div data-full-width="true"><figure><img src="/files/3Go5uvbQeSRKoffk8BKw" alt=""><figcaption></figcaption></figure></div>

* Öffnen Sie den Menüpunkt **Engineering \[A]** \
  ▷ Der Arbeitsbereich "Engineering" öffnet sich.
* Klicken Sie auf **\[B] Notifications providers**\
  ▷ Das Menü "Notifications providers" öffnet sich

  ▷ Sie sehen eine Liste der verfügbaren Notification providers.
* Um zu der **Job diagnostic** zu gelangen klicken Sie auf **\[C] " Show job diagnostic"**

***

## **Die Job Diagnostik Seite**

<div data-full-width="true"><figure><img src="/files/7HknThDWOjeR0ASDtuOu" alt=""><figcaption></figcaption></figure></div>

<table data-full-width="true"><thead><tr><th width="92"></th><th width="127"></th><th></th></tr></thead><tbody><tr><td><strong>[A]</strong></td><td>ID</td><td>Die ID der Notification </td></tr><tr><td><strong>[B]</strong></td><td>Funktion</td><td>Über welchen Notification Provider eskaliert wurde.</td></tr><tr><td><strong>[C]</strong></td><td>Empfänger</td><td>An wen eskaliert wurde.</td></tr><tr><td><strong>[D]</strong></td><td>Start</td><td>Wann die Notification angefangen hat.</td></tr><tr><td><strong>[E]</strong></td><td>Erstellt</td><td>Wann die Notification getriggert wurde.</td></tr><tr><td><strong>[F]</strong></td><td>Delivered by</td><td>Von wem die Notification erstellt wurde.</td></tr><tr><td><strong>[G]</strong></td><td>Status</td><td>Der Status der Notification .</td></tr><tr><td><strong>[H]</strong></td><td>Details</td><td>Die Details kann man ausklappen, hier können Sie sehen von welchem Alarm oder welchem Ticket die Notification ausgelösst wurde. Ausserdem Sehen sie wie wann die letzte Notification dieses Alarms gesendet wurde wie oft diese wiederholt wurde und wie lange es gedauert hat.</td></tr><tr><td><strong>[I]</strong></td><td>Suchen</td><td>Hier können Sie die Notificationen nach verschiedenen Sachen filtern.</td></tr><tr><td><strong>[J]</strong></td><td>Mehr Optionen</td><td>Klicken die hier um <strong>[K]</strong> zu öffnen</td></tr><tr><td><strong>[K]</strong></td><td>Gehe zu</td><td>Hier können Sie direkt zum Alarm oder Ticket gehen der diese Notification ausgelöst hat</td></tr><tr><td><strong>[L]</strong></td><td>Seiten Einstellungen</td><td>Stellen Sie hier ein wie viele Jobs Sie sehen wollen oder springen Sie zur nächsten oder zur vorherigen Seite.</td></tr></tbody></table>


---

# Agent Instructions
This documentation is published with GitBook. GitBook is the documentation platform designed so that both humans and AI agents can read, navigate, and reason over technical content effectively. Learn more at gitbook.com.

## Querying This Documentation
If you need additional information that is not directly available in this page, you can query the documentation dynamically by asking a question.

Perform an HTTP GET request on the current page URL with the `ask` query parameter, and the optional `goal` query parameter:

```
GET https://docs.buildings.ability.abb/collection/german-14.2-freezed/dokumentation/alarme-regeln-und-eskalationen/eskalationen/notification-provider/job-diagnostic.md?ask=<question>&goal=<endgoal>
```

`ask` is the immediate question: it should be specific, self-contained, and written in natural language.
`goal` is optional and describes the broader end goal you are ultimately trying to accomplish on behalf of the user. GitBook uses it to tailor the answer towards what is most useful for that goal.

The response will contain a direct answer to the question and relevant excerpts and sources from the documentation.

Use this mechanism when the answer is not explicitly present in the current page, you need clarification or additional context, or you want to retrieve related documentation sections.