> For the complete documentation index, see [llms.txt](https://docs.buildings.ability.abb/collection/llms.txt). Markdown versions of documentation pages are available by appending `.md` to page URLs; this page is available as [Markdown](https://docs.buildings.ability.abb/collection/german-14.2-freezed/dokumentation/widgets/vordefinierte-widgets/lichtsteuerung.md).

# Lichtsteuerung

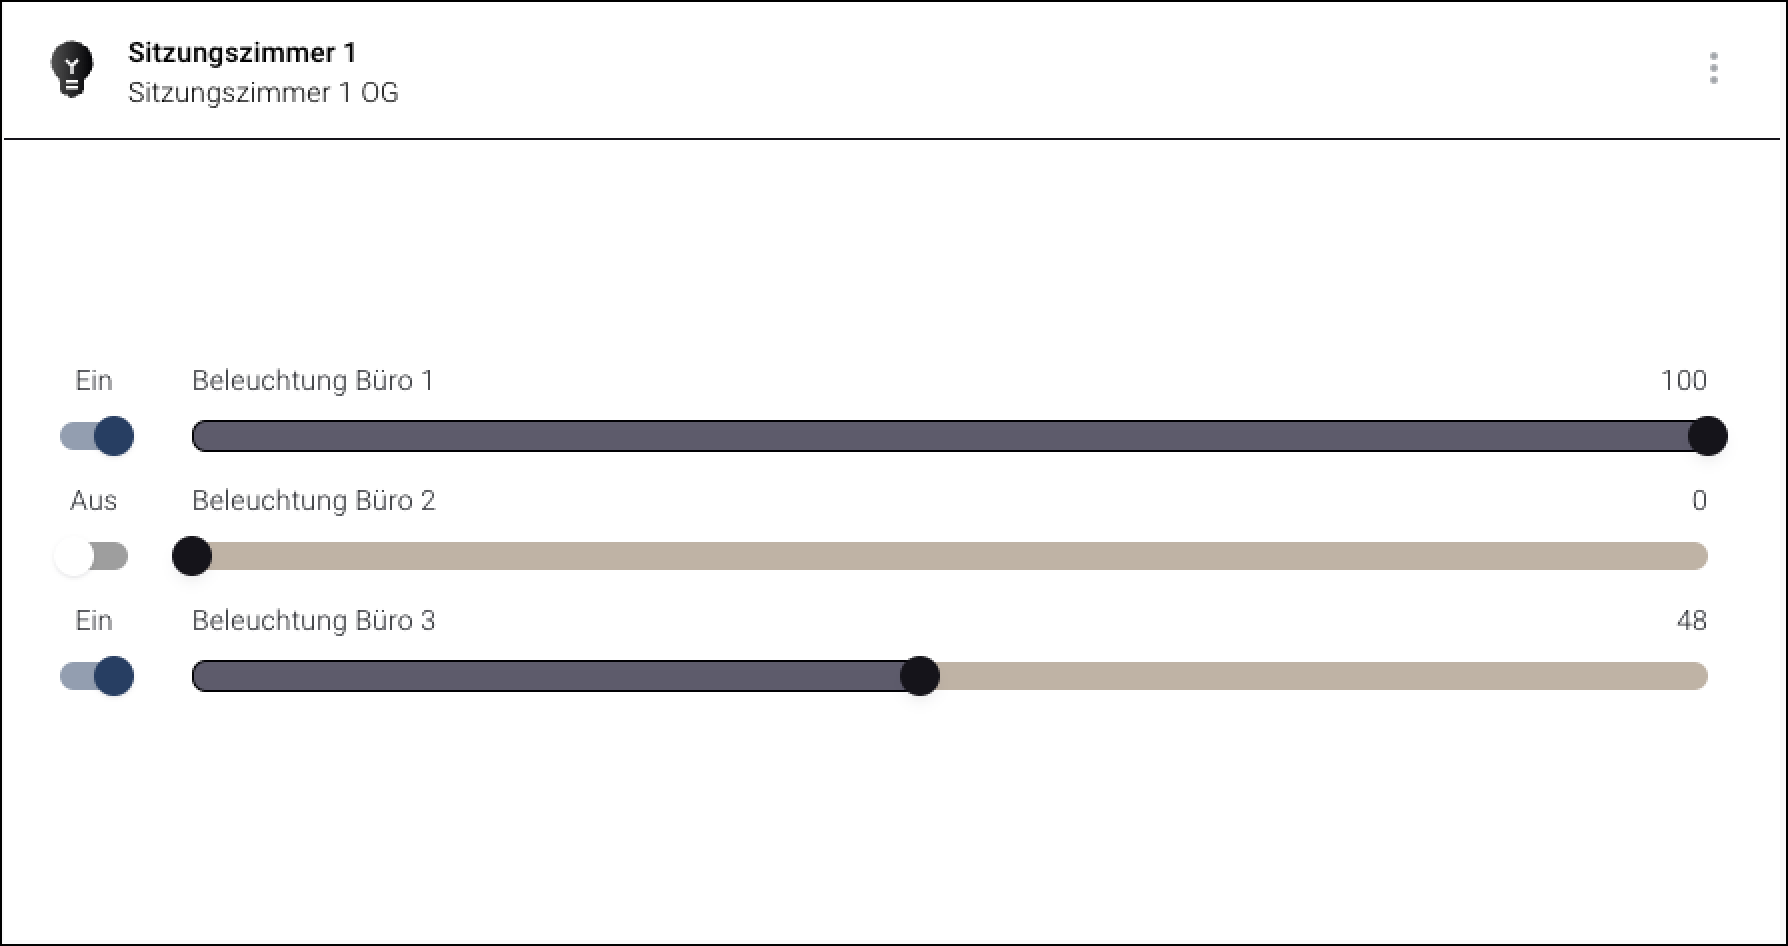
Das Widget "Lichtsteuerung" ist vervindet die Möglichkeiten der Widgets -> Schalter und -> Slider miteinander. Es ermöglicht, ein oder mehrere Geräte sowohl zwischen zwei Zuständen zu schalten als auch genaue Werte auf einer Skala einzustellen.

<figure><img src="https://content.gitbook.com/content/Nyvwhz1kEMXcHf4HLuZ8/blobs/vV2jEHLUSIJgoBxGDhZV/48E61A37-CF9D-480F-8AFC-0C89456FBFFF.png" alt=""><figcaption><p>Das Widget "Lichtsteuerung" mit 3 verbunden Asserts</p></figcaption></figure>

## Wann sollte dieses Widget verwendet werden?

Das Widget "Lichtsteuerung" ist speziell für die Benutzung mit dimmbaren Leuchten entwickelt.

## Widget Konfigurieren

\[SPD]

1. Vergewissern Sie sich, dass Sie sich im Menü "Dashboard" befinden
2. Klicken Sie auf "Widget hinzufügen"
3. Klicken Sie auf "Eingabe"
4. Klicken Sie auf "Lichtsteuerung"
5. Wählen Sie das Primäre Asset. Der Name dieses Assets wird in der Titelzeile des Widgets erscheinen.
6. Wählen Sie das Asset, das Sie über den Schalter steuern wollen.
7. (Optional) Geben Sie dem Asset einen Namen
8. Wählen Sie den Sollwert aus
9. Wählen Sie den aktuellen Wert aus
10. (Optional) Führen Sie die vorherigen Schritte erneut aus, um für weitere Assets Schalter zu erstellen
11. Optional: Wählen Sie, wie viel Raum Ihr neues Widget auf dem Dashboard einnehmen soll.
12. Klicken Sie auf "Widget hinzufügen"

## Widget bedienen

### Überblick

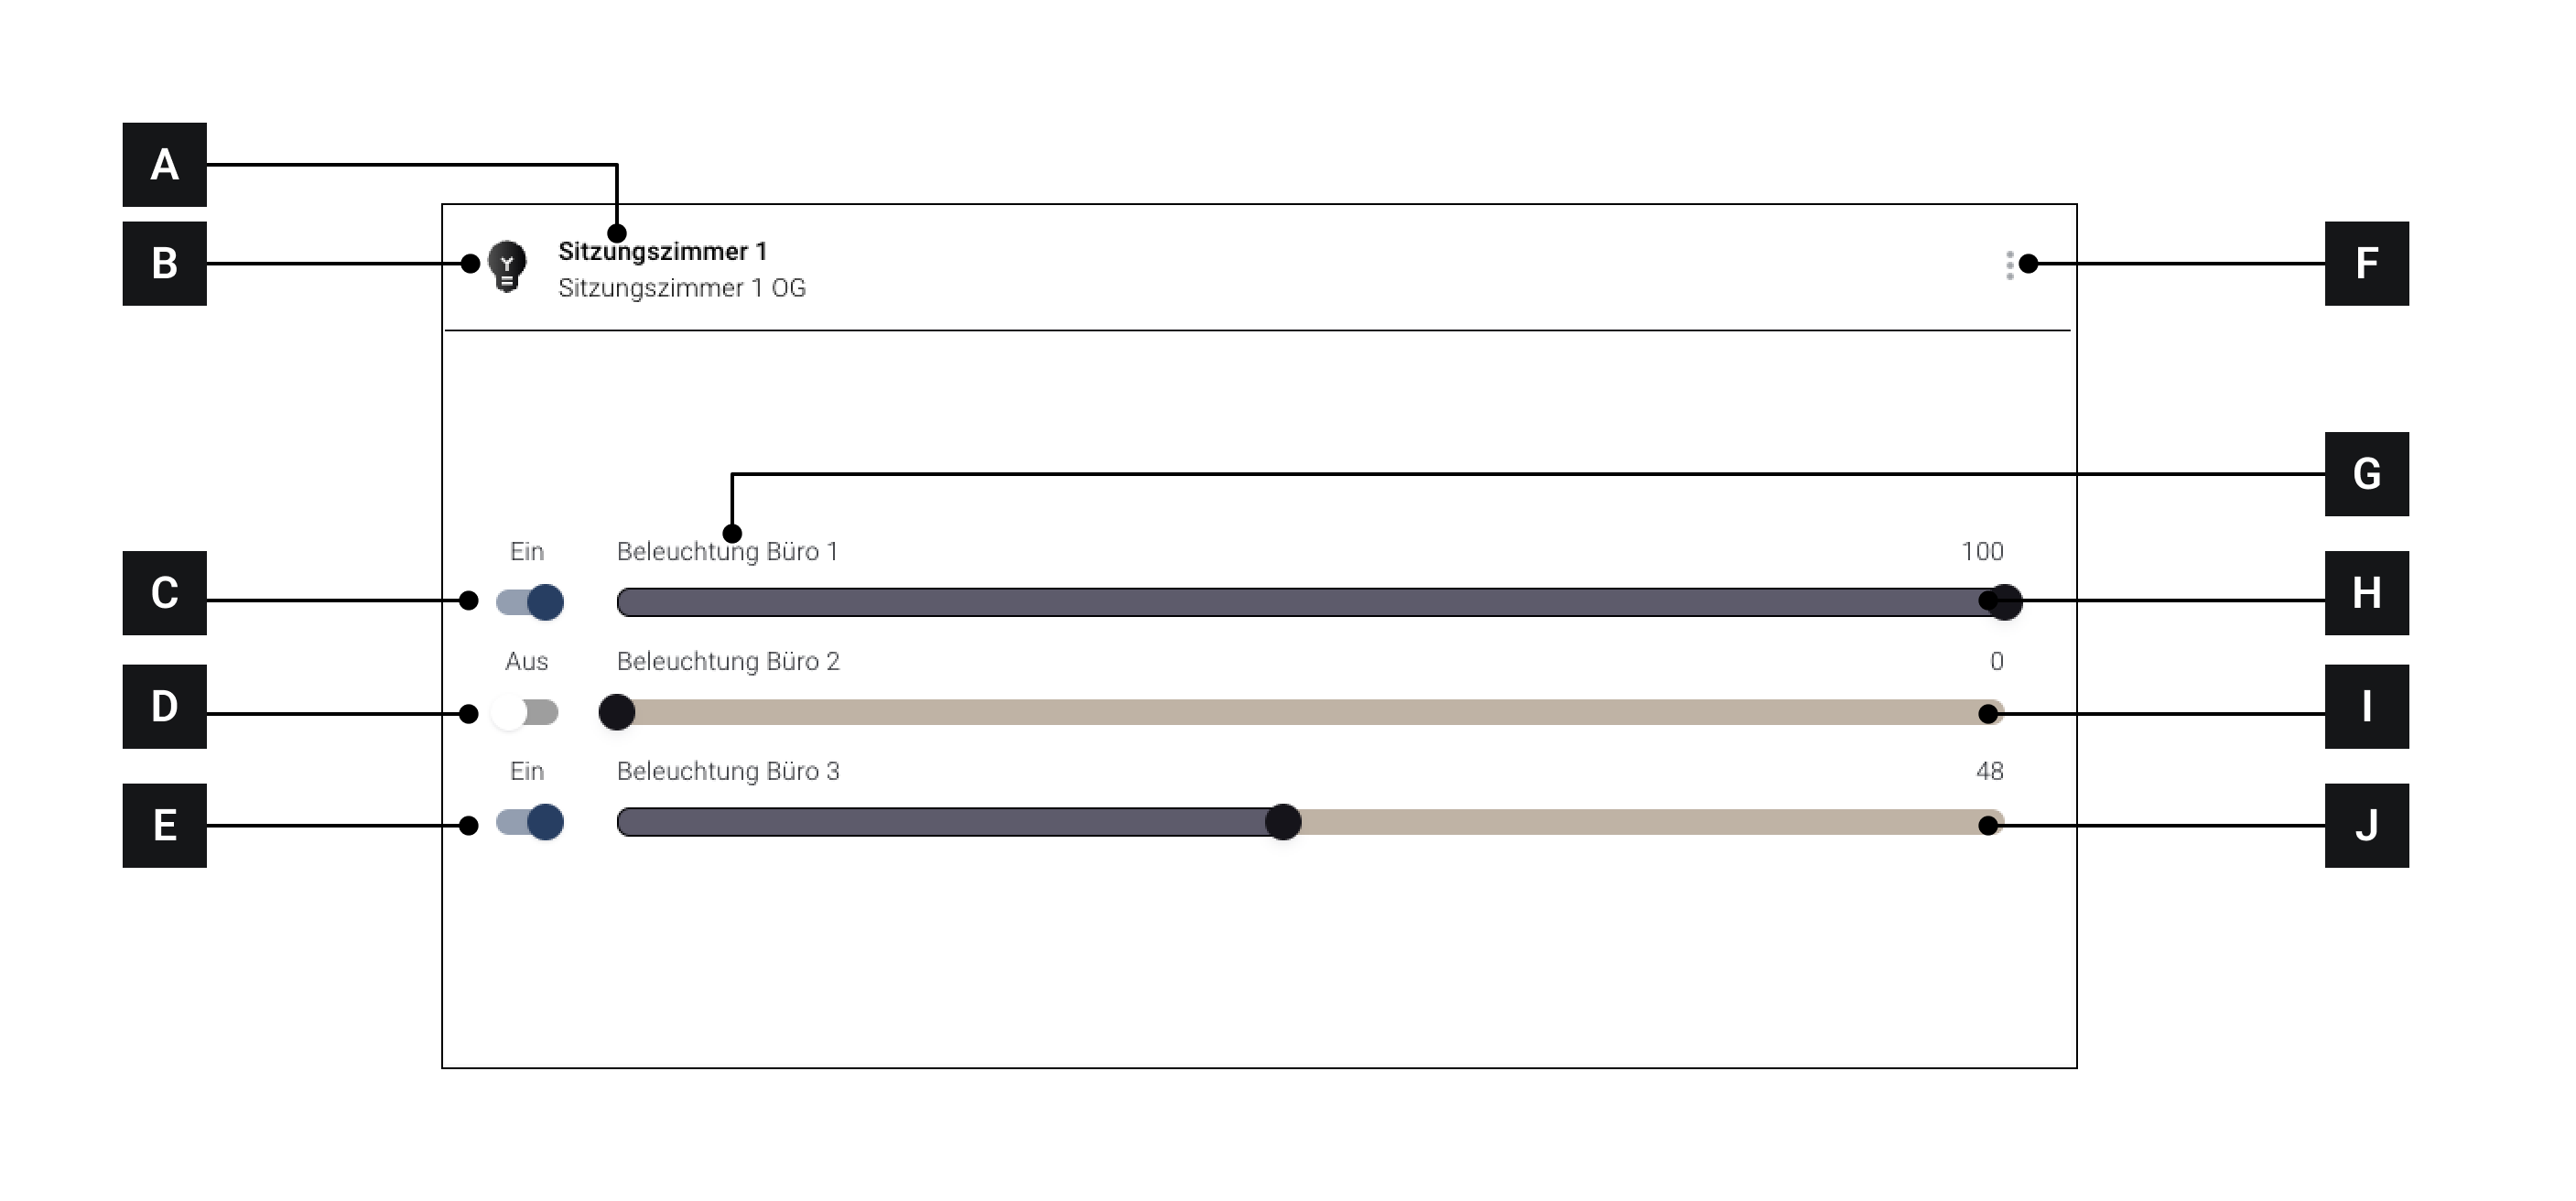
<div data-full-width="true"><figure><img src="https://content.gitbook.com/content/Nyvwhz1kEMXcHf4HLuZ8/blobs/c5HMKNfRgYiRCp7AuEEI/C8CE51DA-4008-42A8-9DCA-2B75308F9273.png" alt=""><figcaption><p>Das Widget "Lichtsteuerung" mit 3 verbunden Assets im Detail</p></figcaption></figure></div>

<table><thead><tr><th width="81.33333333333331"></th><th width="275"></th><th></th></tr></thead><tbody><tr><td><strong>[A]</strong></td><td>Icon</td><td>Icon des Widgets</td></tr><tr><td><strong>[B]</strong></td><td>Asset-Name</td><td>Titel des Widgets. Wird von der Auswahl des „Primären Assets“ beeinflusst.</td></tr><tr><td><strong>[C]</strong></td><td>Schalter für Asset 1</td><td>Asset 1 auf "Aus" oder "Ein" schalten</td></tr><tr><td><strong>[D]</strong></td><td>Schalter für Asset 2</td><td>Asset 2 auf "Aus" oder "Ein" schalten</td></tr><tr><td><strong>[E]</strong></td><td>Schalter für Asset 3</td><td>Asset 3 auf "Aus" oder "Ein" schalten</td></tr><tr><td><strong>[F]</strong></td><td>Mehr Optionen</td><td></td></tr><tr><td><strong>[G]</strong></td><td>Bezeichnung für Asset 1</td><td></td></tr><tr><td><strong>[H]</strong></td><td>Slider für Asset 1</td><td>Wert für Asset 1 einstellen</td></tr><tr><td><strong>[I]</strong></td><td>Slider für Asset 2</td><td>Wert für Asset 2 einstellen</td></tr><tr><td><strong>[J]</strong></td><td>Slider für Asset 3</td><td>Wert für Asset 3 einstellen</td></tr></tbody></table>

### Widget Bedienen

Jedem hinzugefügten einzelnen Asset ist ein eigener Schalter **\[C]/\[D]/\[E]** und ein eigener Slider **\[H]/\[I]/\[J]** zugeordnet.

* Ziehen Sie den Slider eines Assets auf einen gewünschten Wert, um den Wert des Assets anzupassen.
* Klicken Sie auf einen Schalter, der sich im Zustand "EIN" befindet, um dieses Asset auf "AUS" zu stellen
* Klicken Sie auf einen Schalter, der sich im Zustand "AUS" befindet, um dieses Asset auf "EIN" zu stellen.


---

# Agent Instructions
This documentation is published with GitBook. GitBook is the documentation platform designed so that both humans and AI agents can read, navigate, and reason over technical content effectively. Learn more at gitbook.com.

## Querying This Documentation
If you need additional information that is not directly available in this page, you can query the documentation by asking a question.

Perform an HTTP GET request on the following URL with the `ask` and `goal` query parameters:

```
GET https://docs.buildings.ability.abb/collection/german-14.2-freezed/dokumentation/widgets/vordefinierte-widgets/lichtsteuerung.md?ask=<question>&goal=<user_goal>
```

`ask` is the immediate question: it should be specific, self-contained, and written in natural language.
`goal` is what the user is ultimately trying to achieve, the reason they need the answer. Sharing it helps GitBook give you a better, more relevant answer. A goal is most helpful when it describes the outcome the user wants rather than restating the question. For example, with `ask=how do I create an API token`, a goal like `automate deployments from our CI pipeline` lets GitBook tailor the answer to that use case.

The response will contain a direct answer to the question and relevant excerpts and sources from the documentation.

Use this mechanism when the answer is not explicitly present in the current page, you need clarification or additional context, or you want to retrieve related documentation sections.