# Configure an Escalation

## Overview

The "Configure Escalation" menu is divided into 5 elements.

<div data-full-width="true"><figure><img src="https://3489494878-files.gitbook.io/~/files/v0/b/gitbook-x-prod.appspot.com/o/spaces%2F9GvUpaatBiReR43XFSMg%2Fuploads%2Fu0sBf4BazeG5cqogDoVR%2F3D15FC22-AF8C-4714-A866-6168D307FF0C.png?alt=media&#x26;token=542fc1af-51a8-4180-9c6f-aca857c17004" alt=""><figcaption><p>
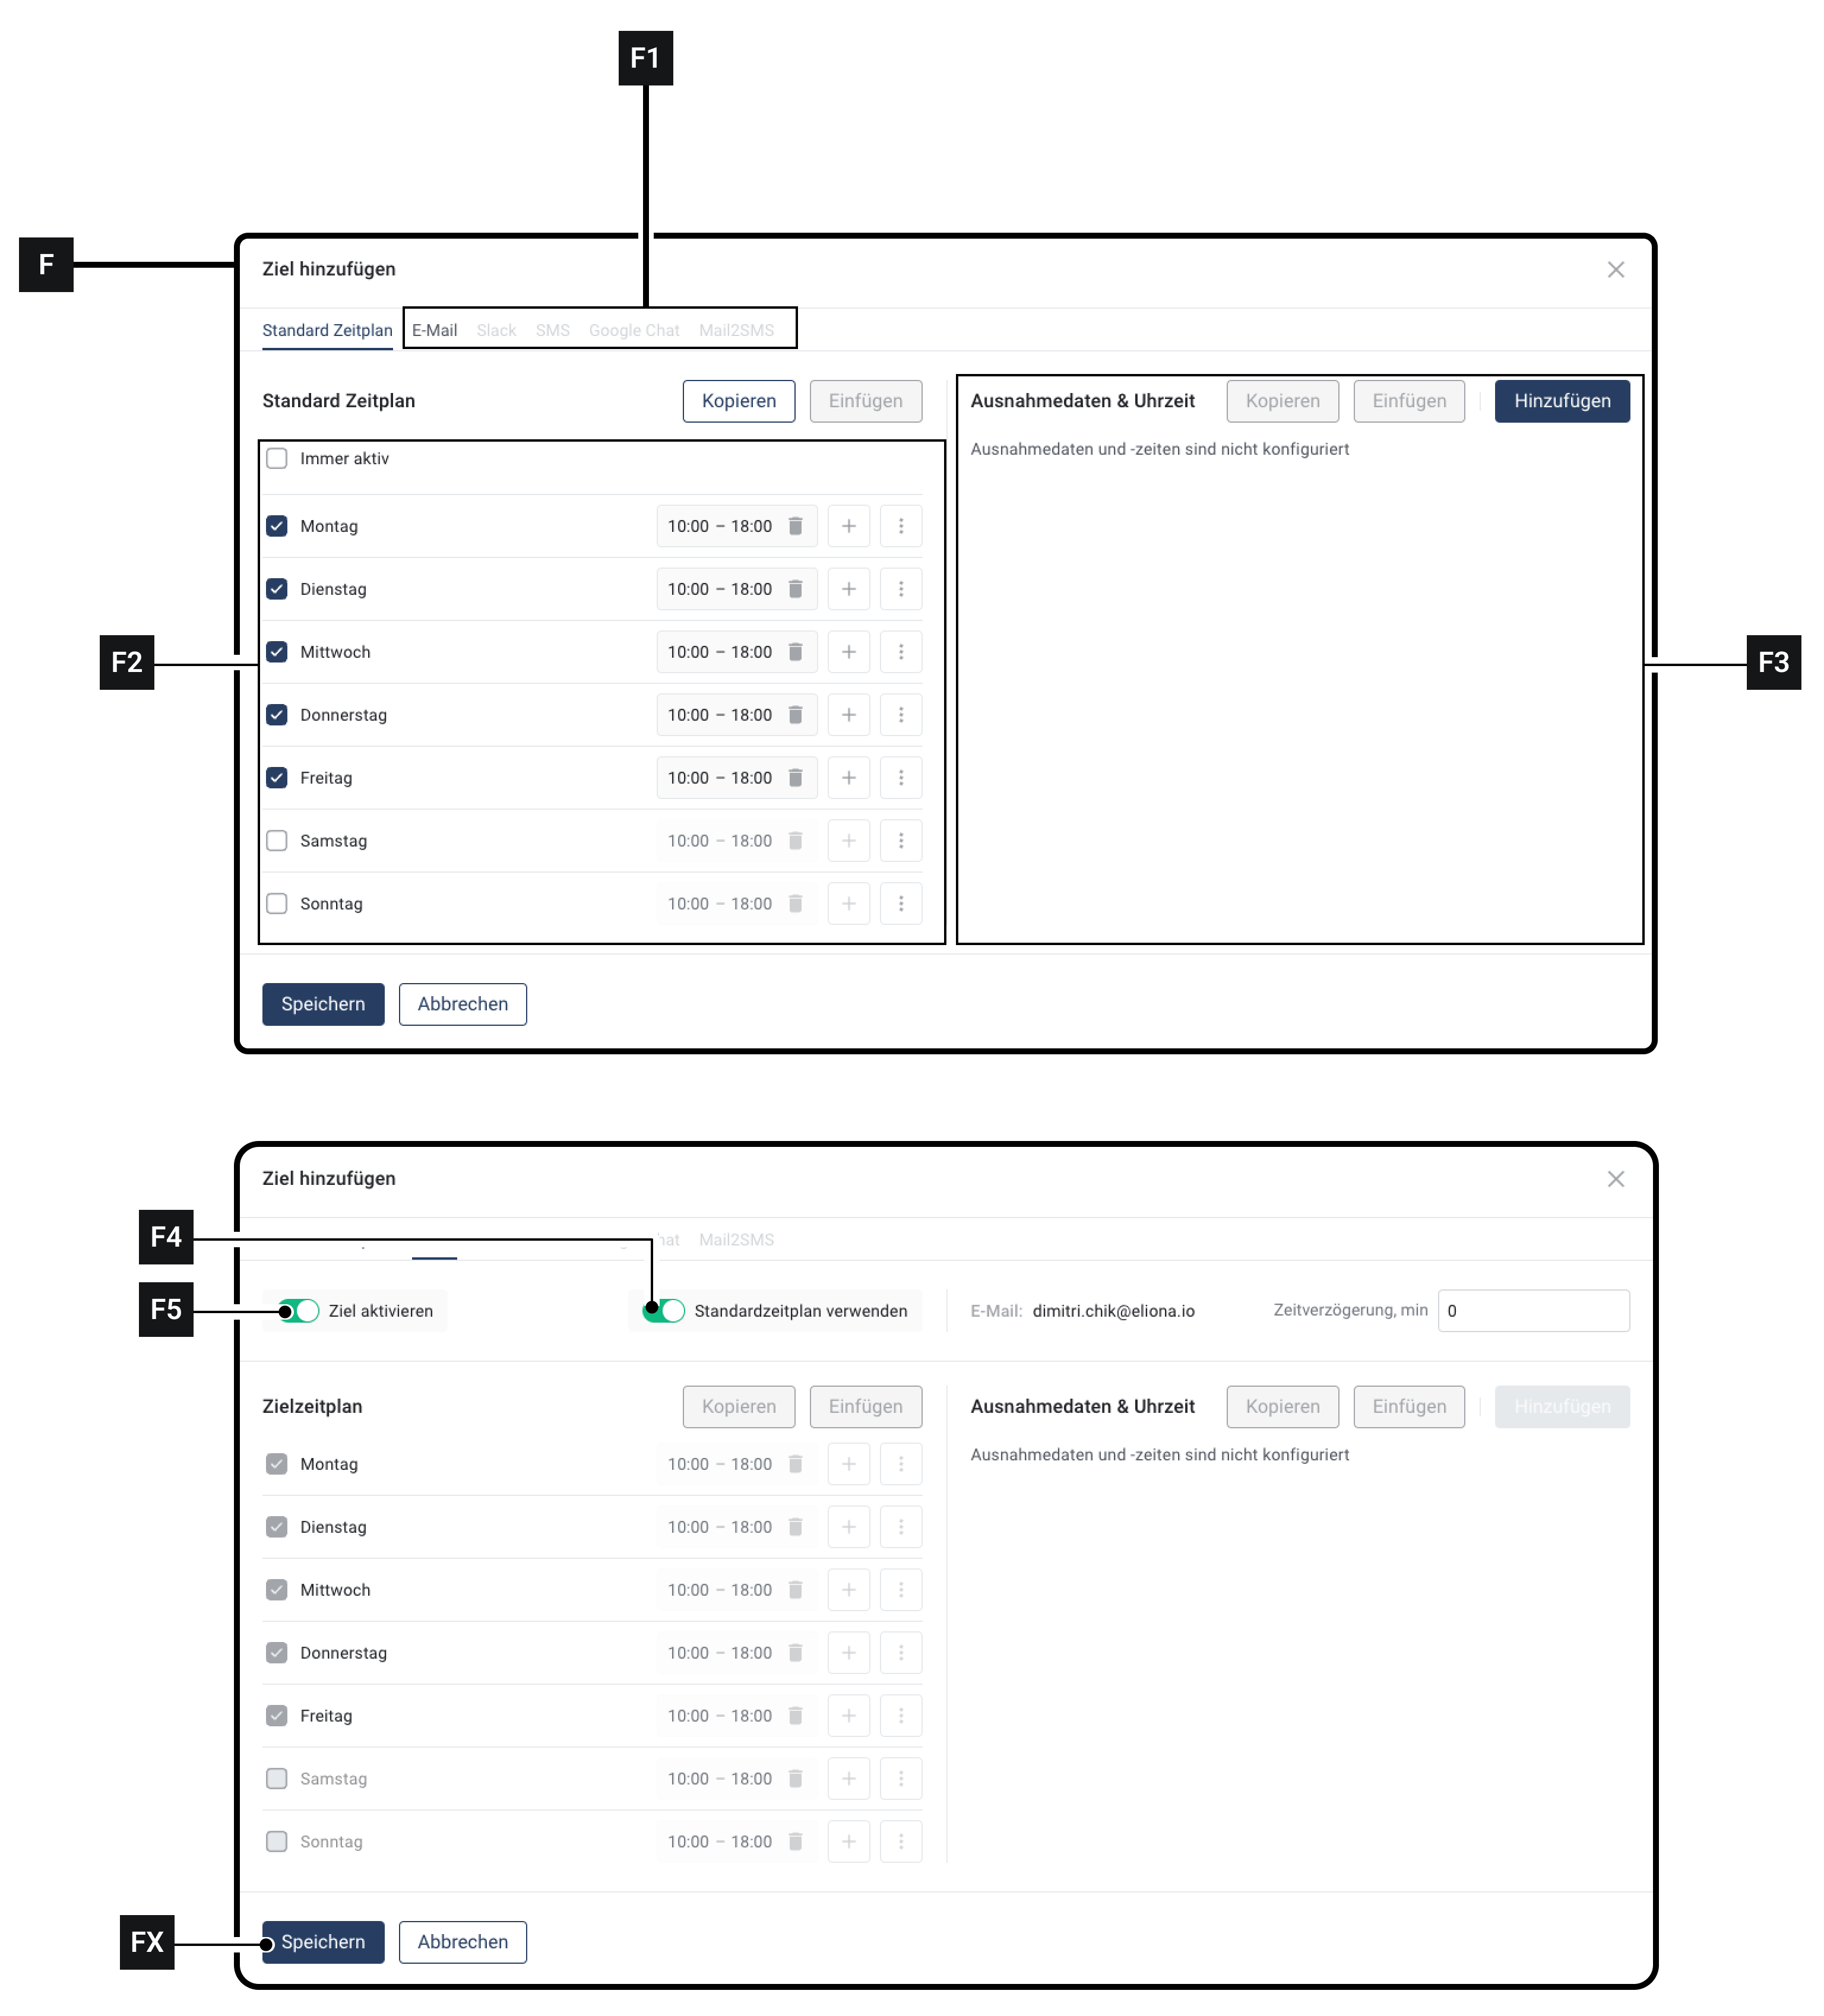
Fig. 1 – The "Configure Escalation" menu in an empty state</p></figcaption></figure></div>

<table><thead><tr><th width="74.33333333333331"></th><th width="170"></th><th></th></tr></thead><tbody><tr><td><strong>[A]</strong></td><td>Escalation Name</td><td>Here you can adjust the name of the escalation afterward</td></tr><tr><td><strong>[B]</strong></td><td>General Calendar</td><td>Here you select the General Calendar.</td></tr><tr><td><strong>[C]</strong></td><td>Tags for Escalating</td><td>Here you specify which alarms are escalated.</td></tr><tr><td><strong>[D]</strong></td><td>Tags with Users and Destinations</td><td>Here you specify to which users an alarm is escalated.</td></tr><tr><td><strong>[E]</strong></td><td>Calendars and Schedules</td><td>Here you see details and can make further adjustments</td></tr></tbody></table>

## 1 – Add General Calendar

### 1.1 – Overview

In this step, you select **WHEN** an alarm should be escalated.

This is done by selecting 1 or more *General Calendars*. Alarms are only escalated on dates that are selected in these calendars.

The *General Calendars* are selected in **Element \[B]**. In Fig. 2, 1 General Calendar **\[B7]** has been added. The dates that have been selected in the calendar are also displayed.

{% hint style="info" %}
If no general calendar exists: Here you can learn how to [-> create a General Calendar.](https://docs.buildings.ability.abb/collection/platform/platform-core/alert-and-escalation/escalations/create-a-general-calendar)
{% endhint %}

After a calendar has been added, a **timeline \[E1]** appears in **Element \[E]**. Using this timeline, you can also read when the alarm is escalated. In Fig. 2, for example, a break has been inserted on November 1st. This means that no escalations would take place on November 1st.

<div data-full-width="true"><figure><img src="https://3489494878-files.gitbook.io/~/files/v0/b/gitbook-x-prod.appspot.com/o/spaces%2F9GvUpaatBiReR43XFSMg%2Fuploads%2FoXVNBEwVKLXtrjK0mkSC%2F1F5614EE-052E-41A4-B04C-AD4412B30D56.png?alt=media&#x26;token=a5fb20d2-1327-4033-9f63-aa54dc8854b0" alt=""><figcaption><p>Fig. 2 – Selection of a General Calendar</p></figcaption></figure></div>

### 1.2 – Step-by-Step Guide

1. Click on **\[B1]** to add a General Calendar&#x20;

   ▷ The window **\[B2]** appears
2. In **\[B3]**, select a General Calendar&#x20;

   ▷ The selected calendar is displayed in **\[B4]**&#x20;

   ▷ In **\[B6]**, you see the validity dates for the added General Calendar
3. Optional: Select other General Calendars
4. Click on **Add \[B6]**

***

## Step 2 – Tags for Escalating

<div data-full-width="true"><figure><img src="https://3489494878-files.gitbook.io/~/files/v0/b/gitbook-x-prod.appspot.com/o/spaces%2F9GvUpaatBiReR43XFSMg%2Fuploads%2F70ceeaGR8knrD2s0owq6%2F22E396DA-E034-4F48-A9D5-0C36D98531BD.png?alt=media&#x26;token=2a972ab7-1416-4f2e-b4cb-8d0da7f5edf4" alt=""><figcaption></figcaption></figure></div>

#### 2.1 – Overview

In this step, you determine **which** alarms are escalated.

To do this, you use [-> tags.](https://docs.buildings.ability.abb/collection/mandatory-base/platform-core/workspace-and-identity/tags)

As described in the [-> Alarms](https://docs.buildings.ability.abb/collection/platform/alert-center/alarms) chapter, every alarm is based on a [-> rule](https://docs.buildings.ability.abb/collection/platform/alarms-rules-and-escalations/rules). You can assign 1 or more tags to rules.

In window **\[C]**, you can specify 1 or more tags. Only alarms that were triggered via a rule that has the same tags that were also specified in window **\[C]** are escalated.

#### 2.2 – Step-by-Step

1. Click on **\[C1]** to add one or more tags for escalation
2. Added tags appear in element **\[C]**

***

## Step 3 – Tags with Users and Destinations

<div data-full-width="true"><figure><img src="https://3489494878-files.gitbook.io/~/files/v0/b/gitbook-x-prod.appspot.com/o/spaces%2F9GvUpaatBiReR43XFSMg%2Fuploads%2FkyecB9o90aDbAr2N0jhk%2F7A5D3F9E-B6E7-4AD2-AFCB-AC8312880EBE.png?alt=media&#x26;token=3f8c108f-488b-4daa-8fdf-20c56d2c3e74" alt=""><figcaption></figcaption></figure></div>

### 3.1 – Overview

In this step, you choose to which users the alarm should be escalated.

Just as with alarms, you use [-> tags](https://docs.buildings.ability.abb/collection/mandatory-base/platform-core/workspace-and-identity/tags) for this.

In window **\[D]**, you can specify 1 or more tags. Users who have been assigned this tag are then added.

Alarms are escalated to these users.

### 3.2 – Step-by-Step

1. Click on **\[D1]**&#x20;

   ▷ The window **\[D2]** opens
2. Under **\[D3]**, select tags
3. Click on **\[D4]**&#x20;

   ▷ All users who have the selected tags appear in **Element \[D]**&#x20;

   ▷ All users who have the selected tags appear in **Element \[E]**

***

## Step 4 – Select Escalation Channel

<div data-full-width="true"><figure><img src="https://3489494878-files.gitbook.io/~/files/v0/b/gitbook-x-prod.appspot.com/o/spaces%2F9GvUpaatBiReR43XFSMg%2Fuploads%2FT8p2WC1gShLa7P67EnN8%2FE42B8B62-AE5F-4C16-9B5E-CF70DFD69E93.png?alt=media&#x26;token=d087febe-95db-4cbb-8316-a05e3ad30207" alt=""><figcaption></figcaption></figure></div>

### 4.1 – Overview

In this step, you determine on which escalation channel alarms are escalated to a user.

This can be set individually for each user.

### 4.2 – Step-by-Step

1. For the user for whom you want to select the escalation channel: Click on **Edit schedule \[D6]**&#x20;

   ▷ The window **\[F]** opens&#x20;

   ▷ In the row **\[F1]**, you see all escalation channels. Unavailable escalation channels are grayed out
2. Click on the desired escalation channel
3. Make sure that the switch **\[F5]** is activated
4. Click on **Save \[FX]**
5. Click on **\[D5]** to test the escalation

***

## Step 5 – Schedules

### 5.1 – Overview

You can customize a precise schedule for each user to whom an alarm is escalated. This schedule refines the [-> General Calendar.](https://docs.buildings.ability.abb/collection/platform/platform-core/alert-and-escalation/escalations/create-a-general-calendar)

The schedules can be configured individually for each user and each escalation channel.

This makes it possible to notify a user, for example, both by mail and by SMS during normal working hours, but only by mail after working hours.

A separate schedule can be created for each escalation channel, or a standard schedule can be used.

This is the standard schedule for this user. This schedule ONLY APPLIES TO THIS USER!

It should not be confused with the General Calendar.

### 5.2 – Customize Standard Schedule

1. For the user for whom you want to customize the schedule: Click on **Edit schedule \[D6]**&#x20;

   ▷ The window **\[F]** opens&#x20;

   ▷ In the row **\[F1]**, the Standard Schedule tab is selected.
2. In field **\[F2]**, you can adjust the standard schedule.
3. In field **\[F3]**, you can add exceptions.
4. Click on **Save \[FX]** to apply the standard schedule.

### 5.3 – Apply Standard Schedule to an Escalation Channel

1. For the user for whom you want to apply the standard schedule: Click on **Edit schedule \[D6]**&#x20;

   ▷ The window **\[F]** opens&#x20;

   ▷ In the row **\[F1]**, you see all escalation channels. Unavailable escalation channels are grayed out
2. Click on the desired escalation channel
3. Make sure that the switch **\[F5]** is activated
4. Activate the switch **\[F4]**&#x20;

   ▷ The **\[F2]** area is grayed out&#x20;

   ▷ In the **\[F2]** area, the values you configured in [-> 5.2 Customize Standard Schedule](#id-5.2-customize-standard-schedule) appear
5. Click on **Save \[FX]**
6. Repeat this process for each escalation channel to which you want to apply the standard schedule

### 5.4 – Apply Individual Schedule for an Escalation Channel

You can use an individual schedule for each escalation channel.

1. For the user for whom you want to apply the standard schedule: Click on **Edit schedule \[D6]**&#x20;

   ▷ The window **\[F]** opens&#x20;

   ▷ In the row **\[F1]**, you see all escalation channels. Unavailable escalation channels are grayed out
2. Click on the desired escalation channel
3. Make sure that the switch **\[F5]** is activated
4. Make sure that the switch **\[F4]** is deactivated
5. In **Area \[F2]**, configure the individual schedule&#x20;

   ◈ This individual schedule only applies to the escalation channel in which it was configured!
6. Optional: Repeat the process for all desired escalation channels
