> For the complete documentation index, see [llms.txt](https://docs.buildings.ability.abb/collection/llms.txt). Markdown versions of documentation pages are available by appending `.md` to page URLs; this page is available as [Markdown](https://docs.buildings.ability.abb/collection/english-v14/documentation/karte-und-stockwerk/karte.md).

# map

## Overview

With the "Map" function, you can place assets on an interactive map. This makes it possible to track the geographical distribution of all assets.

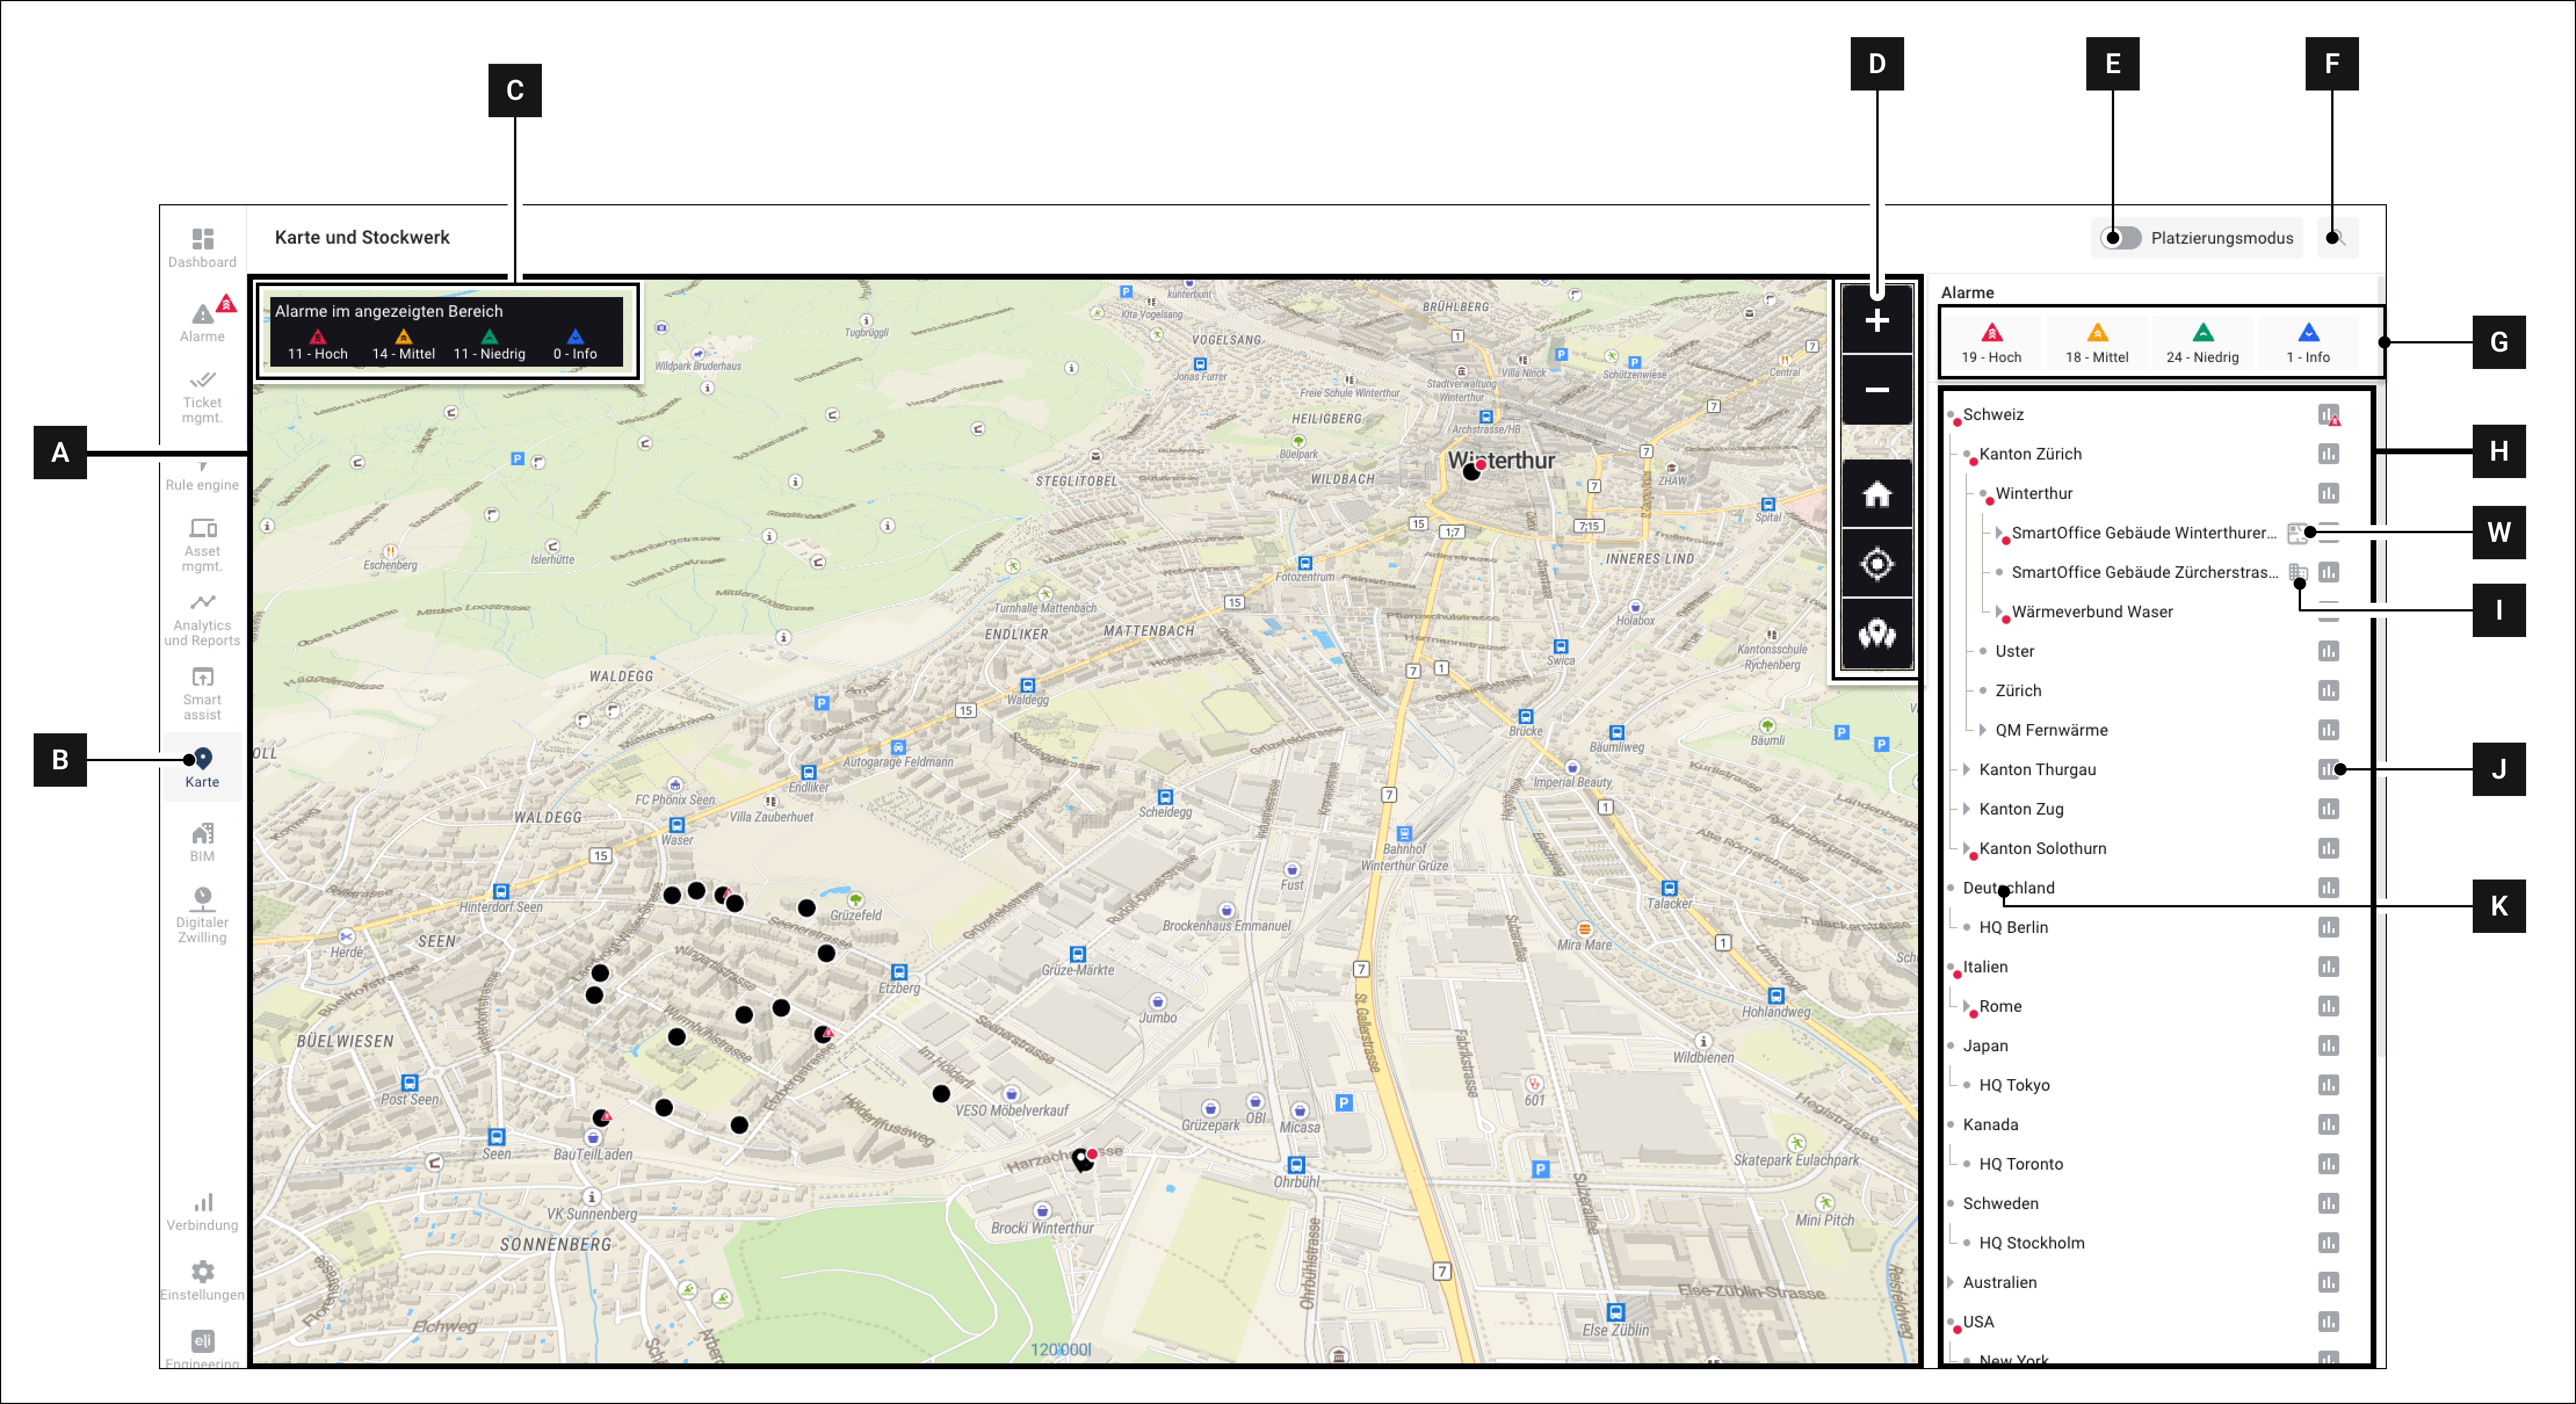
<div data-full-width="true"><figure><img src="https://content.gitbook.com/content/Nyvwhz1kEMXcHf4HLuZ8/blobs/YmmgAyFSA5nicI95zMN3/2F7EC9F5-B06A-4A9E-8D6E-5E4B61E8C0B5.png" alt=""><figcaption><p>Fig. 1 – Overview of the “Map” menu</p></figcaption></figure></div>

<div data-full-width="true"><figure><img src="https://content.gitbook.com/content/Nyvwhz1kEMXcHf4HLuZ8/blobs/qTQfvvGMrywfUlJPJRai/0CC5329E-683C-4164-959D-837CEF190D29.png" alt=""><figcaption><p>Fig. 2 – Overview of the symbols used in the map</p></figcaption></figure></div>

<table data-full-width="true"><thead><tr><th width="62"></th><th width="180"></th><th></th></tr></thead><tbody><tr><td><strong>[A]</strong></td><td>Map</td><td>Interactive map</td></tr><tr><td><strong>[B]</strong></td><td>“Map” menu</td><td>Click to open the “Map” menu</td></tr><tr><td><strong>[C]</strong></td><td>Alarms in the displayed area</td><td>Shows an overview of all alarms in the currently visible map section. Not to be confused with [G]!</td></tr><tr><td><strong>[D]</strong></td><td>Navigation</td><td>See<a href="#in-der-karte-navigieren"> -> Navigate in the map</a></td></tr><tr><td><strong>[E]</strong></td><td>Placement mode</td><td>The <a href="#ein-asset-in-der-karte-platzieren">-> Turn placement mode on/off</a></td></tr><tr><td><strong>[F]</strong></td><td>Search</td><td>Enable search; when searching, the search is not only visualized in the asset tree, but only the points on the map that match the search are displayed.</td></tr><tr><td><strong>[G]</strong></td><td>All alarms</td><td>Shows all alarms present in the current project that the user has access to.</td></tr><tr><td><strong>[H]</strong></td><td>Sidebar</td><td>Context-sensitive sidebar. The content varies depending on what is currently selected.<br><br>When the "Map" menu is opened, a list of all assets present in the project and accessible to the respective user is displayed by default.</td></tr><tr><td><strong>[I]</strong></td><td>Icon “Building”</td><td>This icon indicates that the respective asset has the type “Building”.</td></tr><tr><td><strong>[W]</strong></td><td>Icon “Floor”</td><td>This icon indicates that the respective asset has the type “Floor”.</td></tr><tr><td><strong>[J]</strong></td><td>Details</td><td>Click to open details for the respective asset</td></tr><tr><td><strong>[K]</strong></td><td>asset</td><td>Asset name.<br>Click the asset name to jump to the asset's location on the map.</td></tr><tr><td><strong>[L]</strong></td><td>Map symbol “Asset”</td><td>This symbol appears on the map and represents an asset. Click this symbol to go to the <a href="/collection/english-v14/documentation/assets/asset-details.md">-> asset details</a> to get there</td></tr><tr><td><strong>[M]</strong></td><td>Map symbol “Multiple assets”</td><td>This symbol appears on the map and represents multiple assets. This symbol is displayed,</td></tr><tr><td><strong>[N]</strong></td><td>Map symbol “Building”</td><td>This symbol appears on the map and represents a building. Click this symbol to go to the <a href="/collection/english-v14/documentation/assets/asset-details.md">-> asset details </a>to get there</td></tr><tr><td><strong>[O]</strong></td><td>Map symbol “Asset with subordinate alarm”</td><td>This symbol appears on the map and represents an asset whose subordinate asset is marked with an alarm.</td></tr><tr><td><strong>[P]</strong></td><td>Map symbols “Assets with alarm”</td><td>This symbol appears on the map and represents an asset for which there is an alarm. The colored triangle symbolizes the respective alarm level.<br>You can find more details in the chapter <a href="/collection/english-v14/documentation/alarme-regeln-und-eskalationen/alarme.md">-> Alarms</a></td></tr><tr><td><strong>[Q]</strong></td><td>Map symbols “Buildings with alarm”</td><td>This symbol appears on the map and represents a building for which there is an alarm. The colored triangle symbolizes the respective alarm level.<br>You can find more details in the chapter <a href="/collection/english-v14/documentation/alarme-regeln-und-eskalationen/alarme.md">-> Alarms</a></td></tr></tbody></table>

## Open map

Click in the sidebar on **Map \[B]**, to open the map.

The default map section is opened.

{% hint style="info" %}
You can define a separate default map section for each user.

Learn more under [-> Set default map section](#standard-kartenausschnitt-festlegen)
{% endhint %}

## Navigate in the map

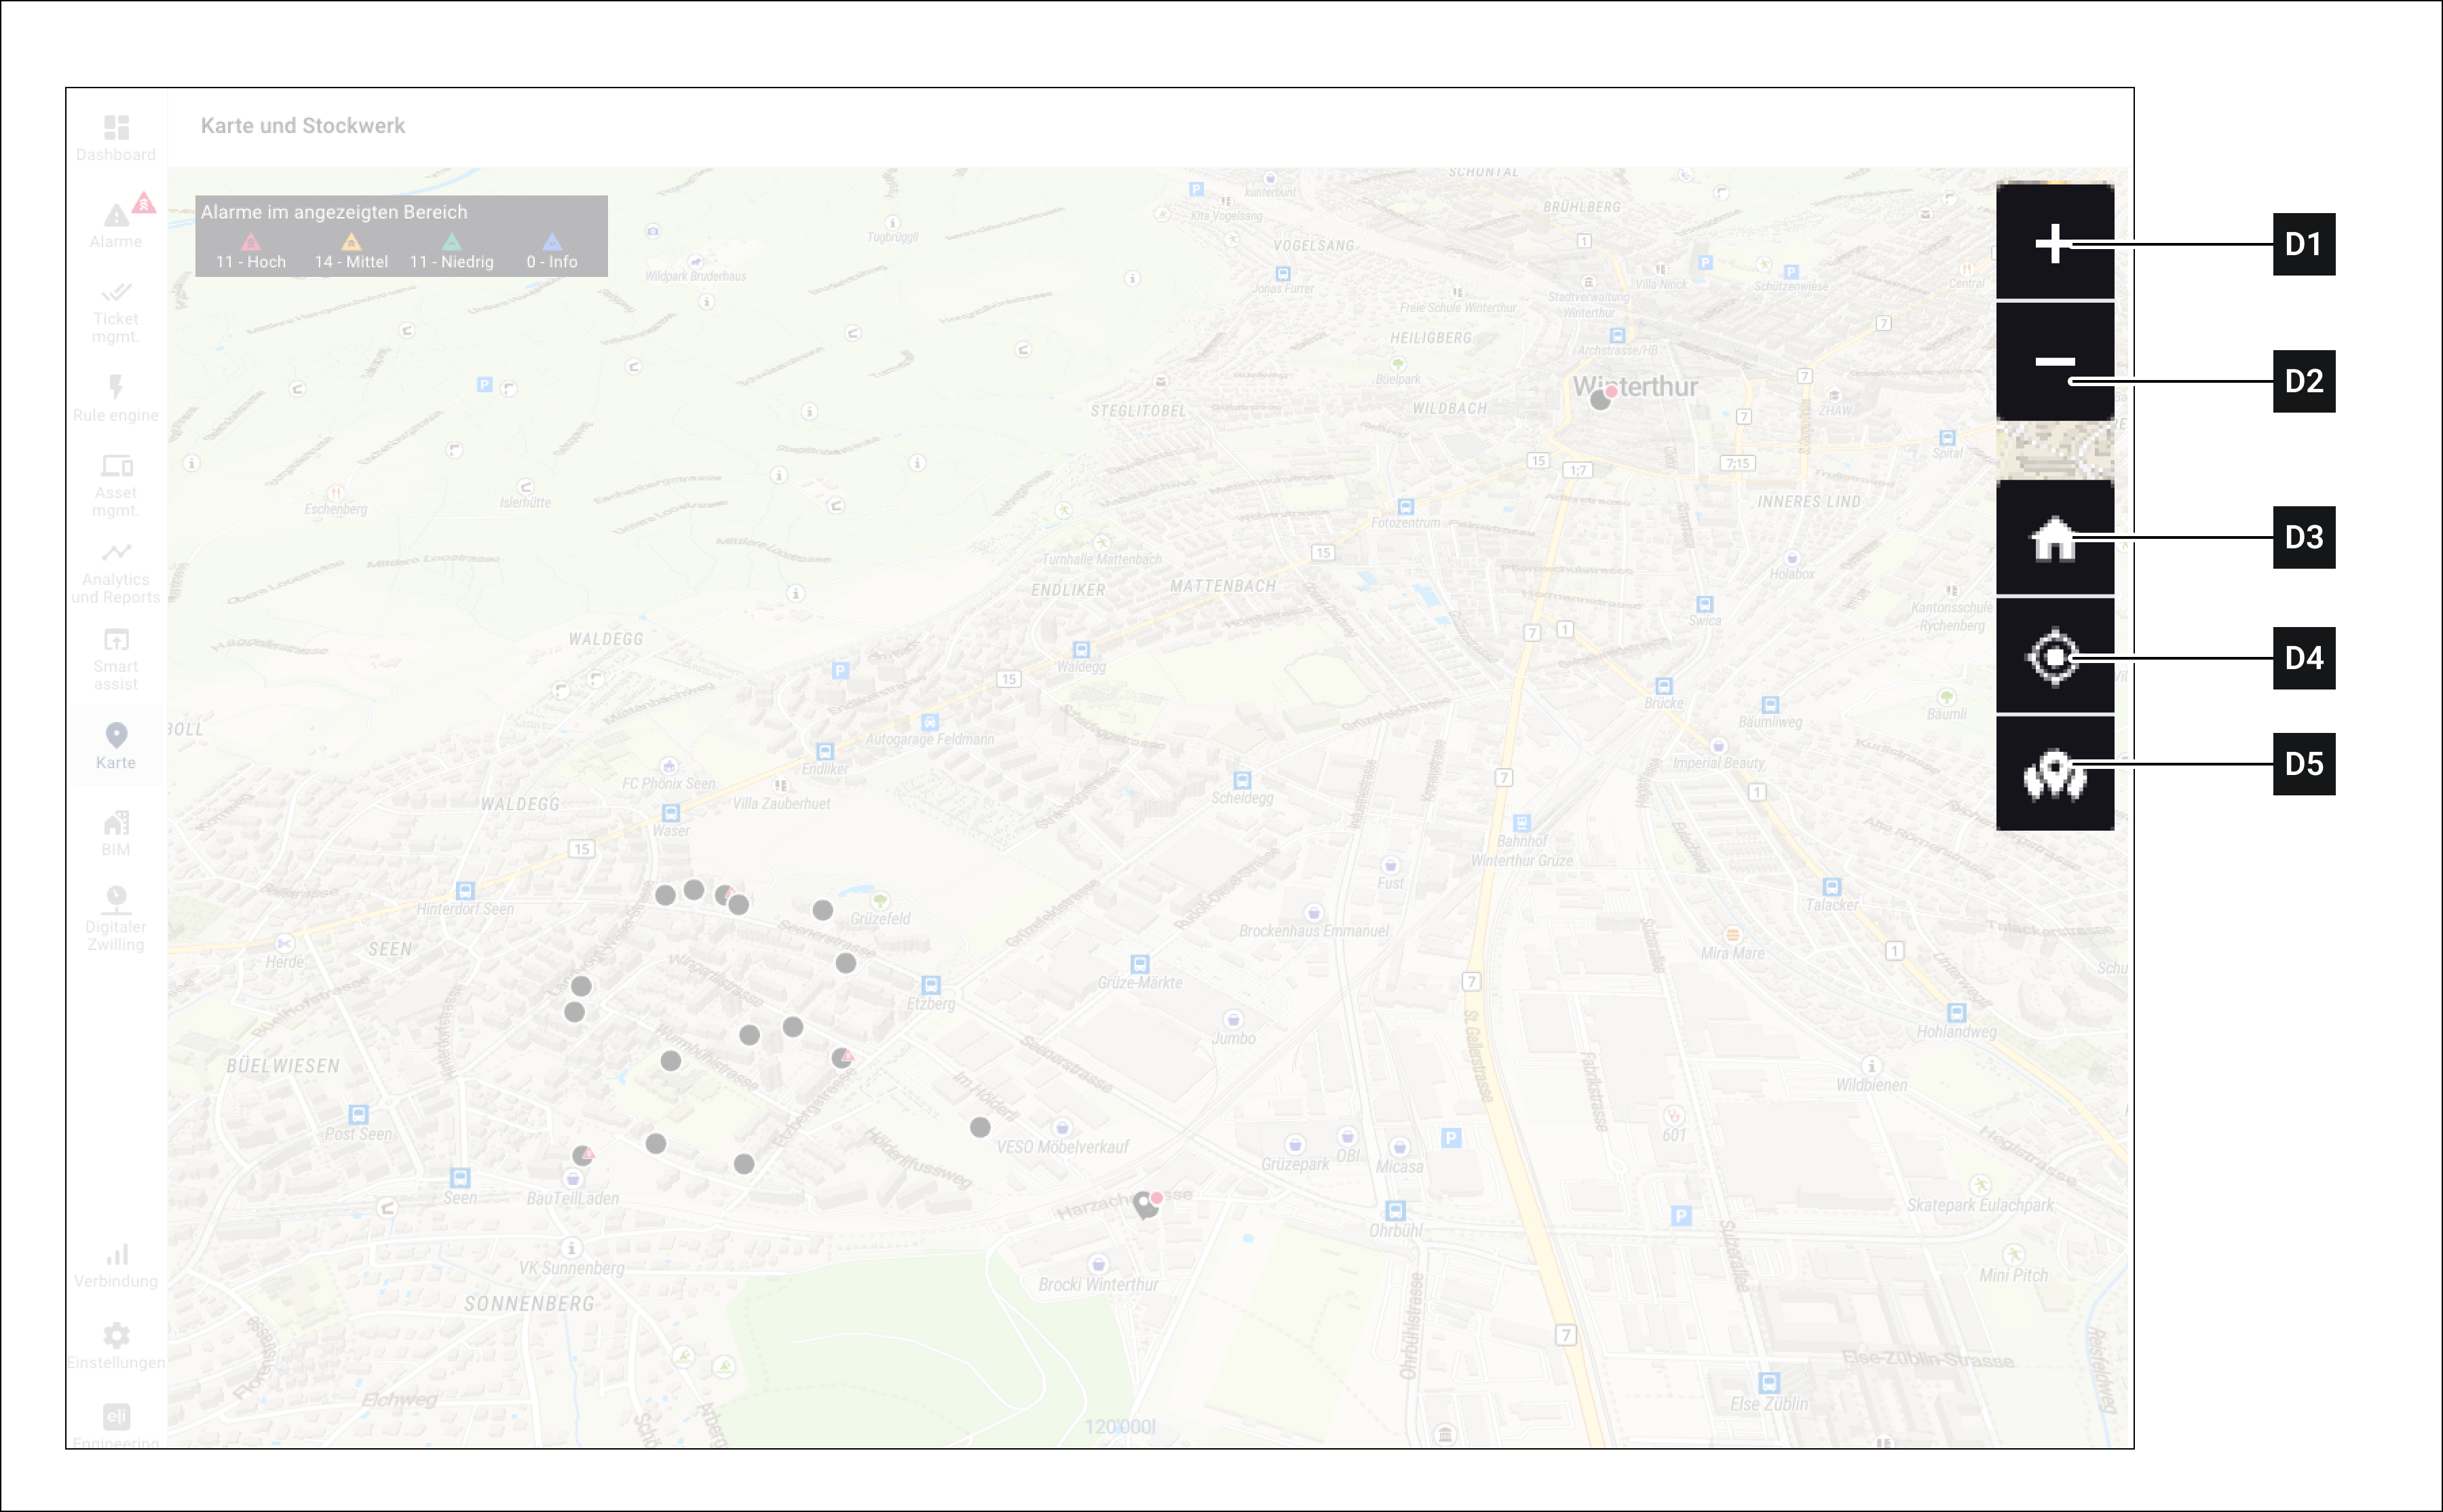
<div data-full-width="true"><figure><img src="https://content.gitbook.com/content/Nyvwhz1kEMXcHf4HLuZ8/blobs/hPsJtFfgUTFDM41pWzwq/CE5D73C8-28DE-4126-AC1C-E7EE4BAB6230.png" alt=""><figcaption><p>Fig. 3 – Navigation detail</p></figcaption></figure></div>

{% hint style="info" %}
An explanation of the abbreviations used can be found under [-> Typographic conventions](/collection/english-v14/preface/typographische-konventionen.md)
{% endhint %}

<table><thead><tr><th width="183"></th><th width="165.33333333333331"></th><th></th></tr></thead><tbody><tr><td><strong>LMB [drag]</strong></td><td>Move map</td><td>Move map section</td></tr><tr><td><strong>RMB [drag]</strong> <em>or</em><br><strong>Ctrl + LMB [drag] -</strong></td><td>Rotate / tilt map</td><td>Rotate map</td></tr><tr><td><strong>Shift + LMB [drag]</strong></td><td>Zoom area</td><td>With this command, you can draw a rectangle on the map. When you release the LMB, it zooms into this rectangle</td></tr><tr><td><strong>MOUSE WHEEL</strong></td><td>Zoom</td><td>Zoom in or out of the map</td></tr><tr><td><strong>[D1]</strong></td><td>Zoom in</td><td>Zooms into the center of the map</td></tr><tr><td><strong>[D2]</strong></td><td>Zoom out</td><td>Zooms out from the center of the map</td></tr><tr><td><strong>[D3]</strong></td><td>Home</td><td>Returns to the default map section</td></tr><tr><td><strong>[D4]</strong></td><td>Jump to current location</td><td>Jump to the user's current location. To use this function, an additional permission may need to be granted via the web browser.</td></tr><tr><td><strong>[D5]</strong></td><td>Show all assets</td><td>Zooms out far enough so that all existing and placed assets are visible on the map.</td></tr></tbody></table>

## Asset list

The asset list appears in the **Sidebar \[H]**, when the “Map” menu is opened.

In the asset list you can see all assets assigned to the project and to which you have access.

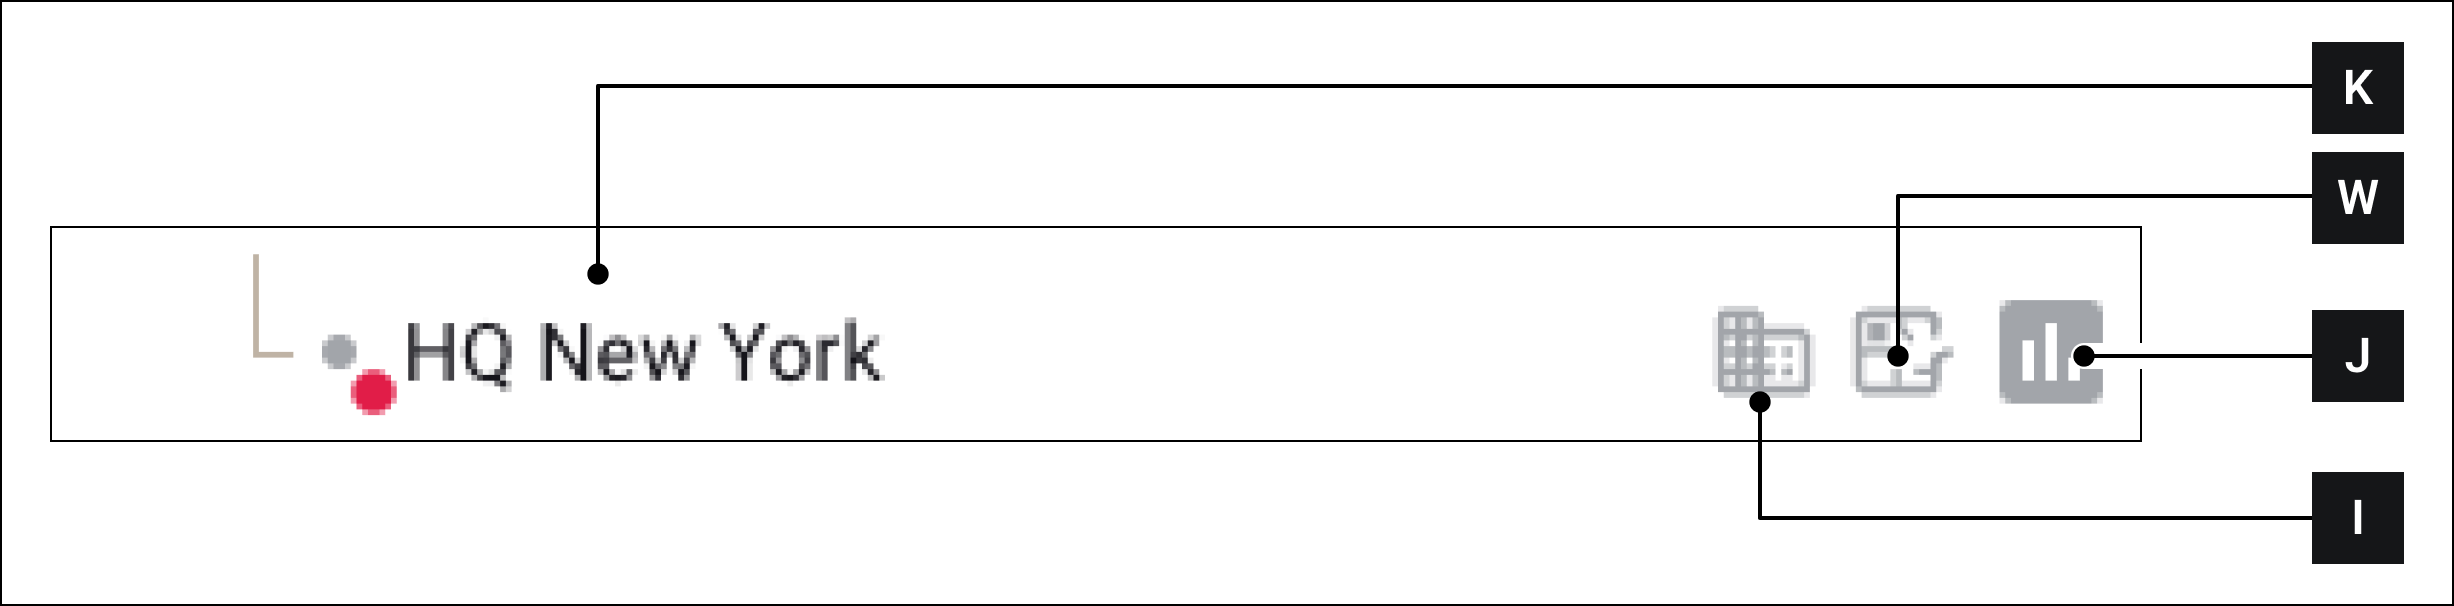
<figure><img src="https://content.gitbook.com/content/Nyvwhz1kEMXcHf4HLuZ8/blobs/IfykeS6XLPv0dl91aGYJ/F14BEC8F-5269-4F48-B6FF-7CEEE2287583.png" alt=""><figcaption><p>Fig. 4 - Asset in the asset list</p></figcaption></figure>

Click on the name of an asset **\[K]**, to jump to its location on the map.

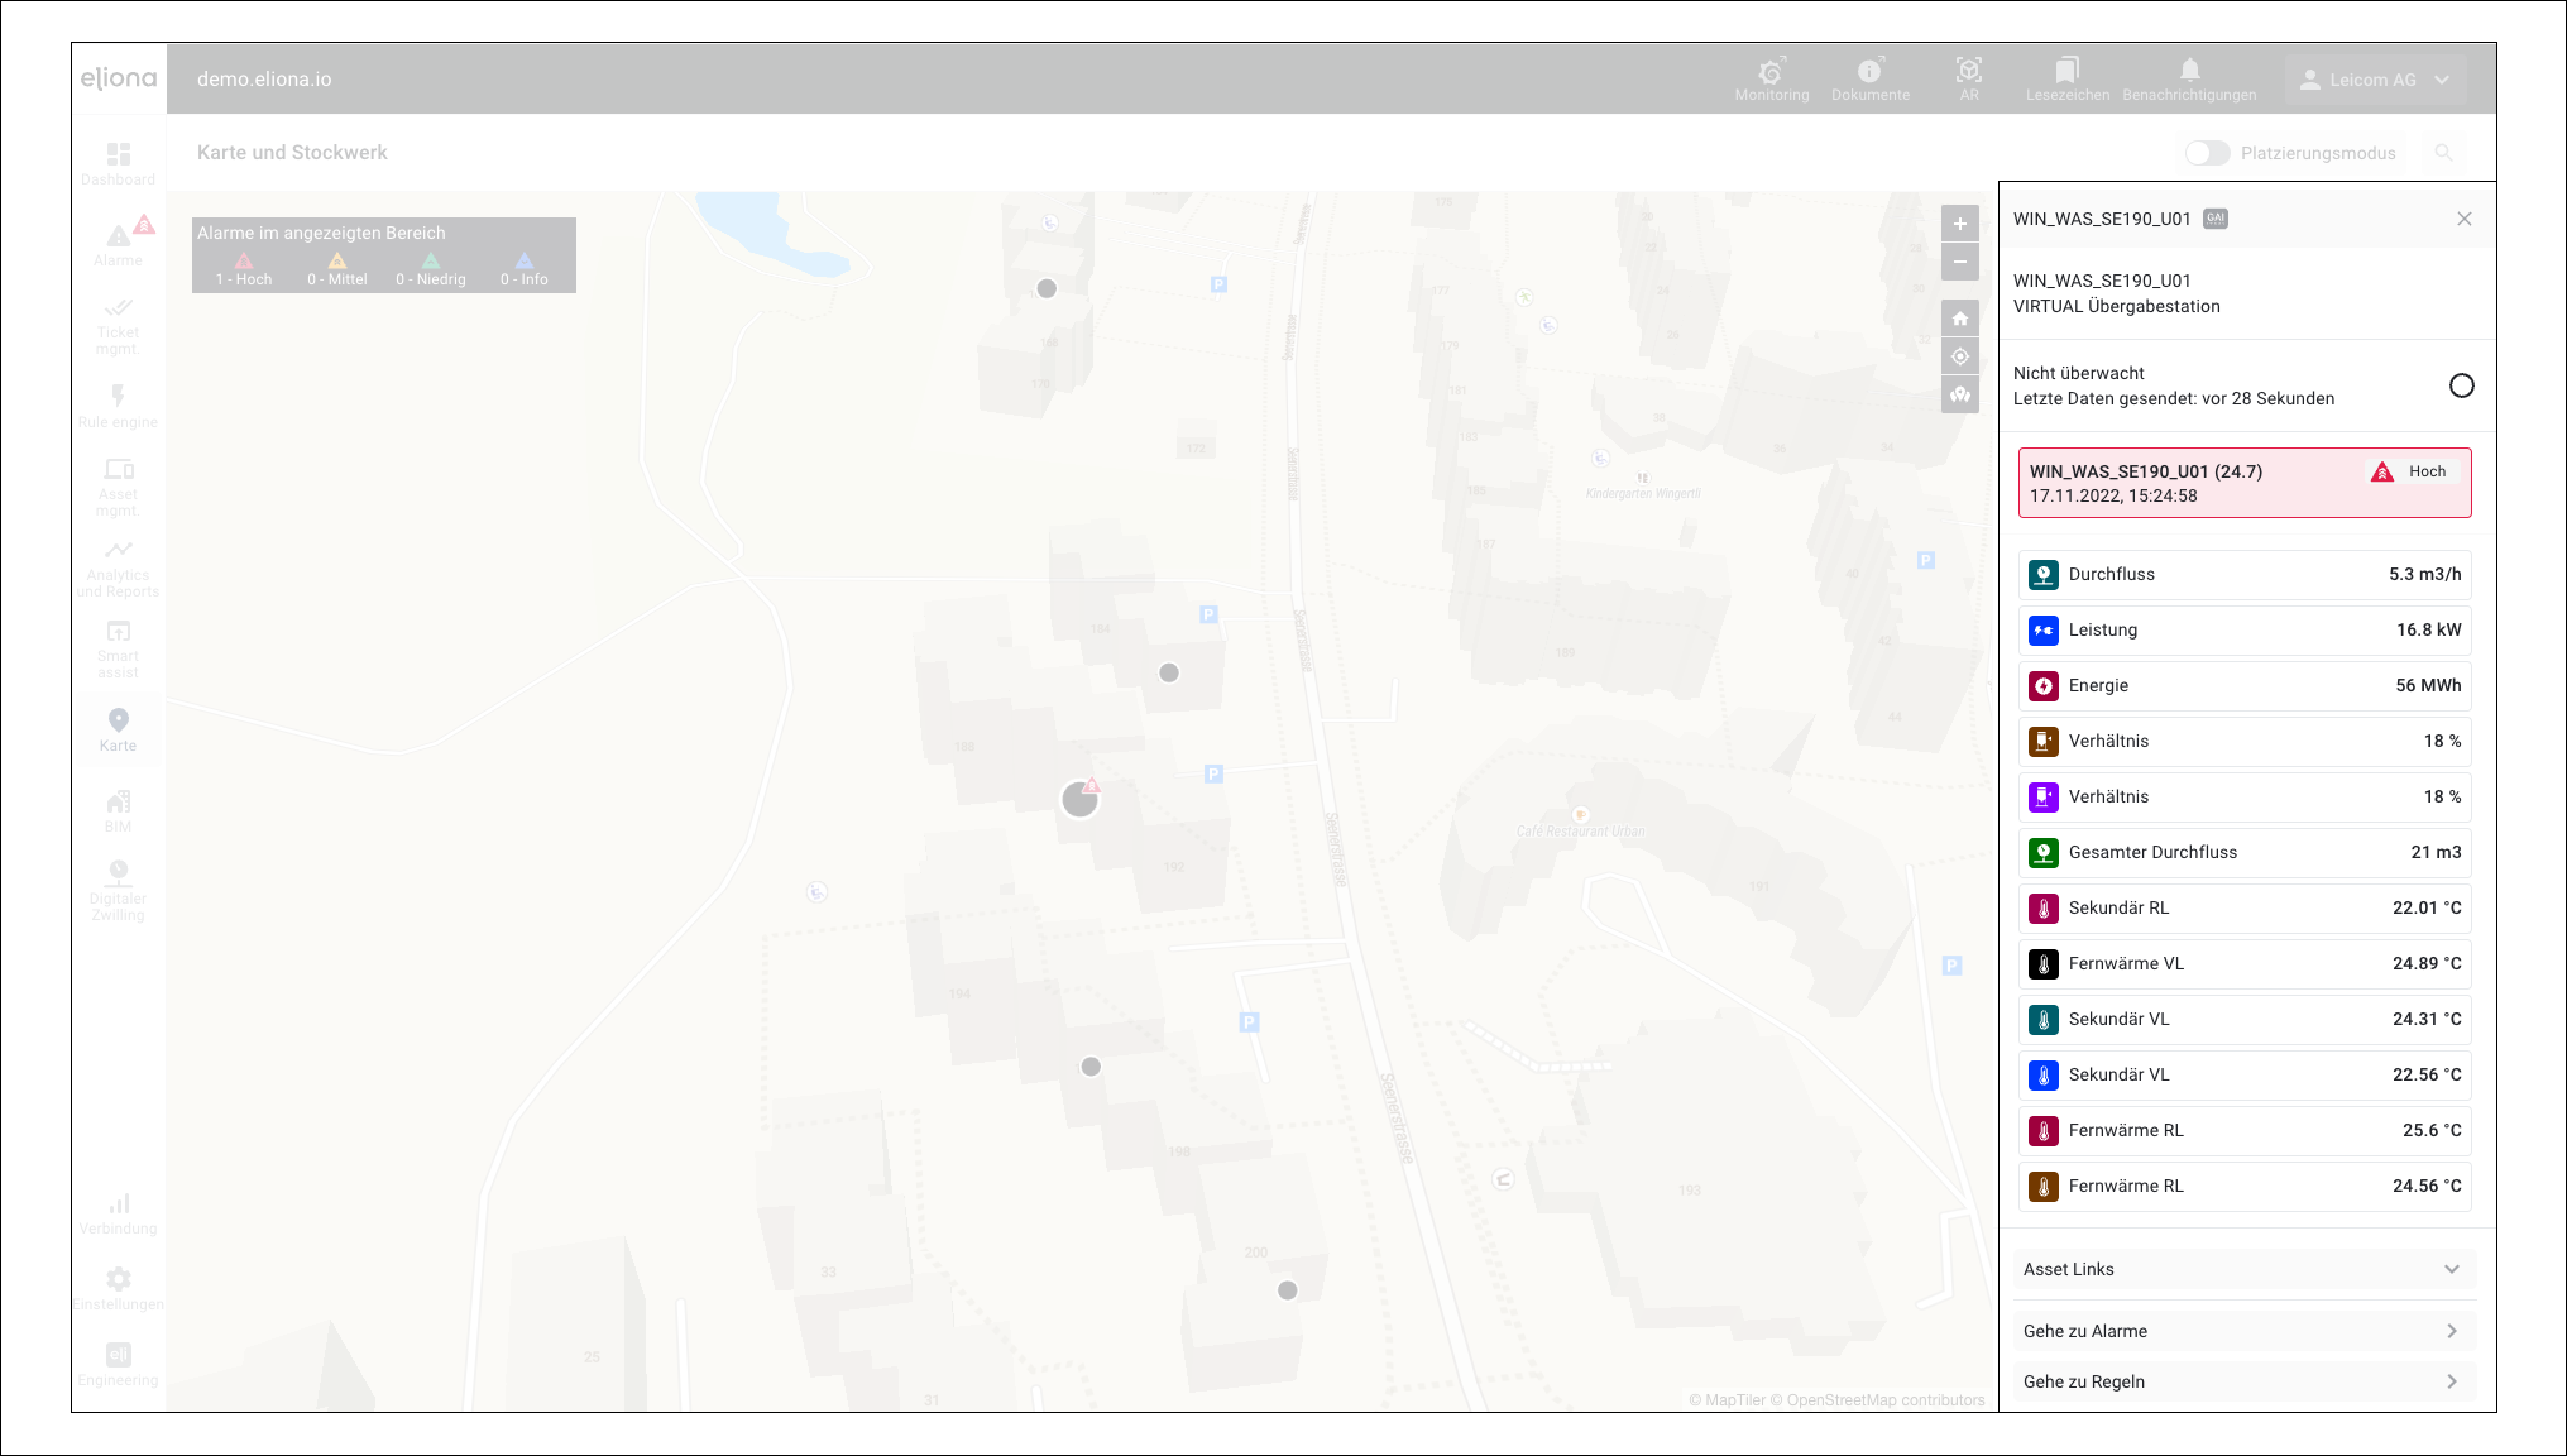
Click on the symbol **\[J]**, to go to the asset details (Fig. 5).

In the asset details you can:

* view the asset's alarms,
* display the asset's attribute values,

and from there navigate to further functions such as:

* the asset's rules,
* other alarms,
* the asset's BIM model,
* the asset's digital twin,
* and the asset links.

The symbol **\[W]**, only exists if the asset is a floor. Click on **\[W]**, to go directly to the “Floor menu”.

{% hint style="info" %}
Learn more about floors in the chapter [-> Floors](/collection/english-v14/documentation/karte-und-stockwerk/stockwerk.md)
{% endhint %}

The symbol **\[I]** only exists if the asset is a building.

<div data-full-width="true"><figure><img src="https://content.gitbook.com/content/Nyvwhz1kEMXcHf4HLuZ8/blobs/L9te6nqMJI1B8BeTO3xZ/9AE06B26-AAB9-45C0-BEFB-043778969519.png" alt=""><figcaption><p>Fig. 5 The “Asset details” appear in the sidebar</p></figcaption></figure></div>

## Place an asset on the map

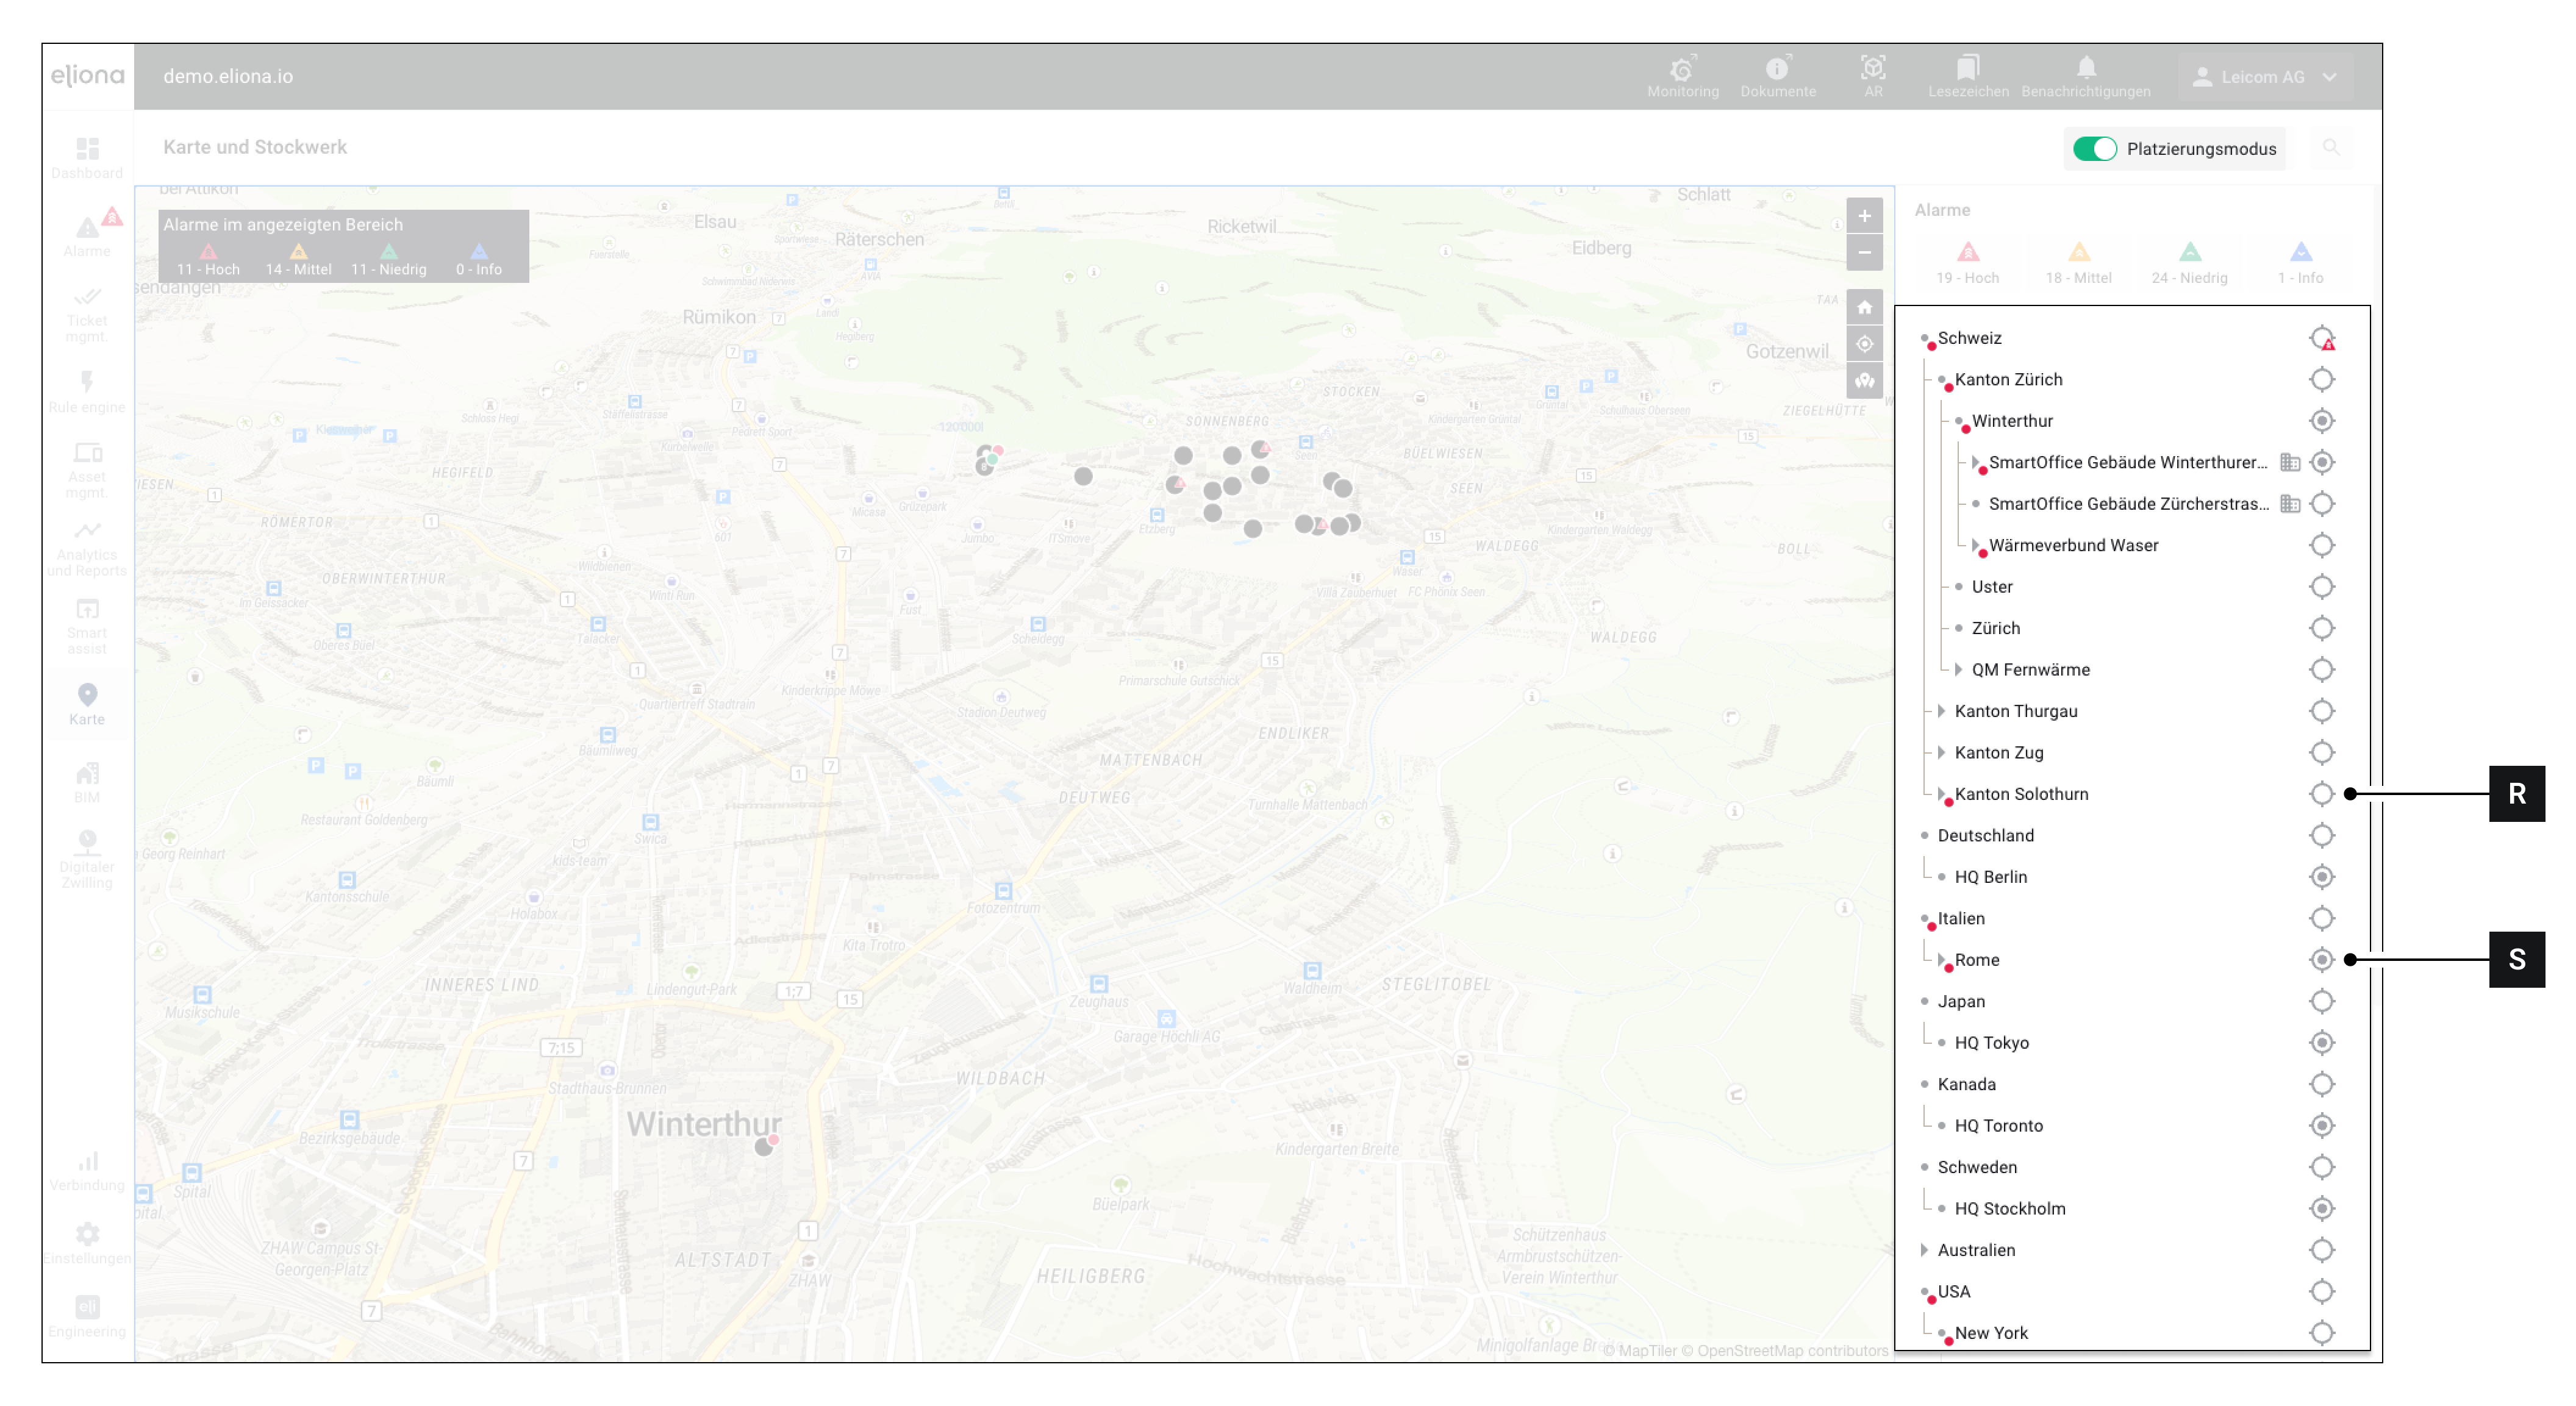
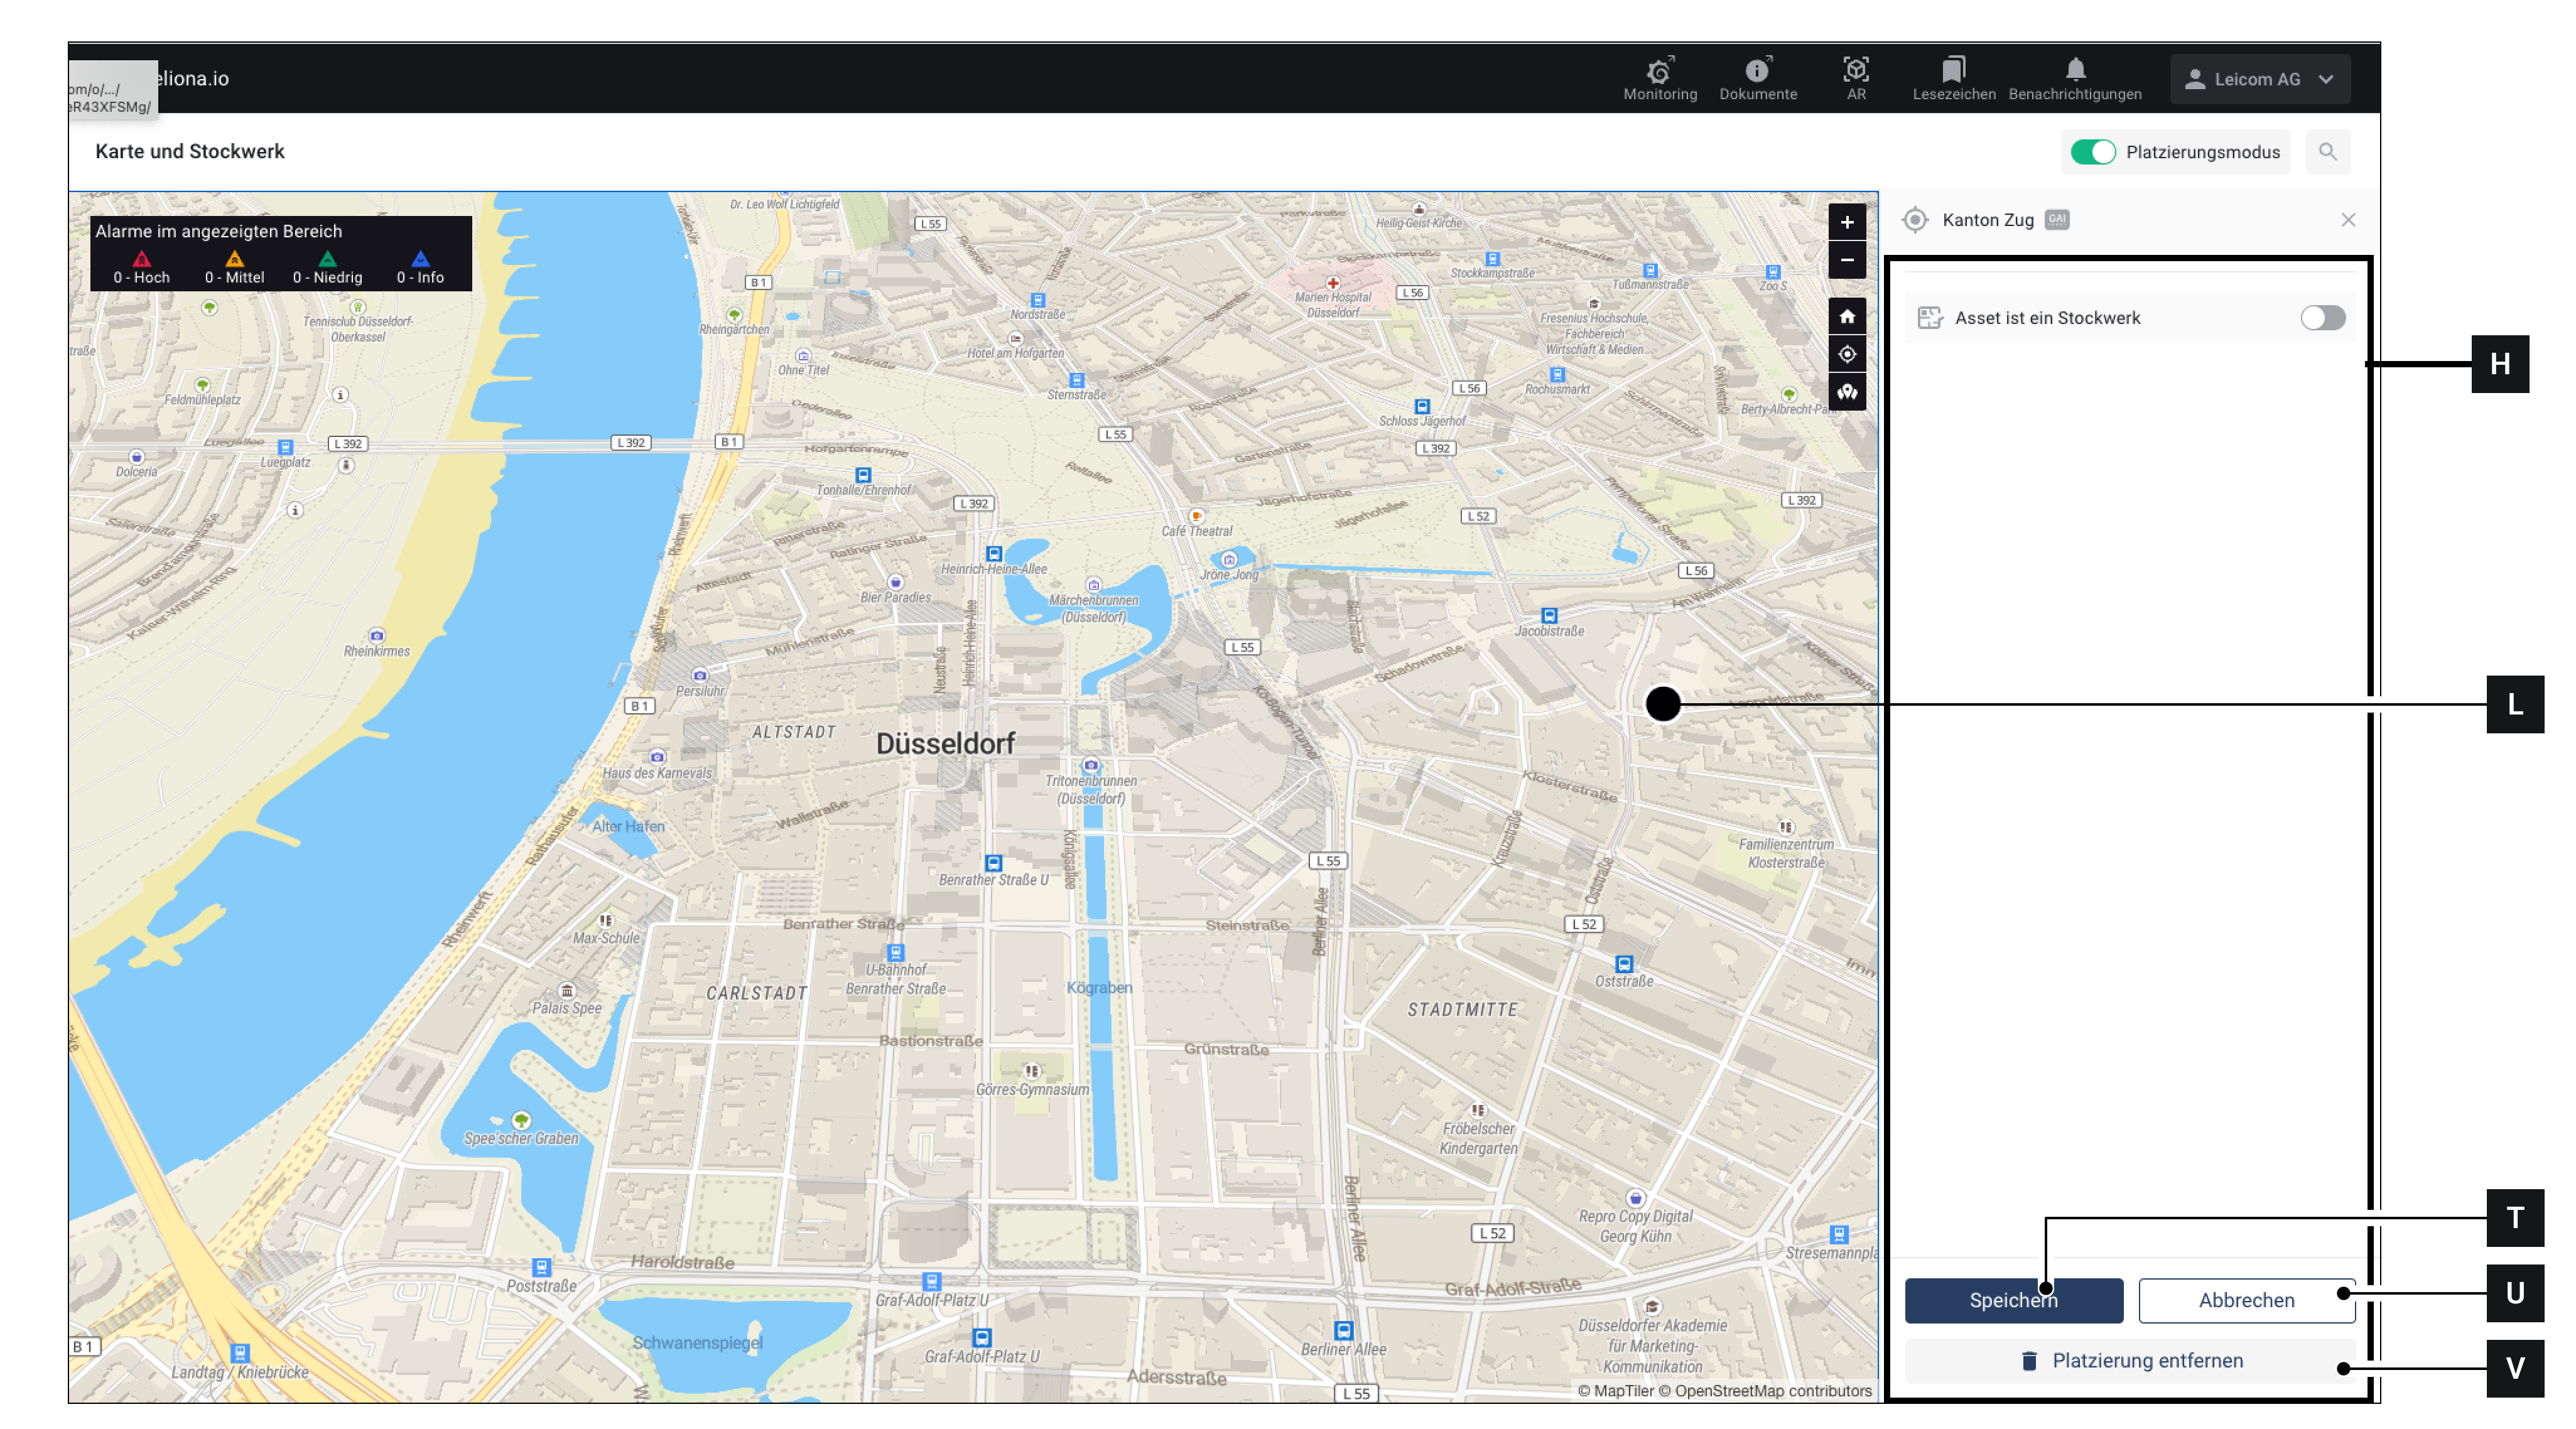
<div data-full-width="true"><figure><img src="https://content.gitbook.com/content/Nyvwhz1kEMXcHf4HLuZ8/blobs/QxDmGSKPLJmqVRfjMlze/97CF8D33-9FE2-4D34-BCF2-A2B6E7A85474.png" alt=""><figcaption><p>Fig. 6 – Placement mode</p></figcaption></figure></div>

<div data-full-width="true"><figure><img src="https://content.gitbook.com/content/Nyvwhz1kEMXcHf4HLuZ8/blobs/QoRiFJ72Kz0DxUTuXcZw/76415A80-43F9-43DF-A90F-19FF66CFEBF9.png" alt=""><figcaption><p>Fig. 7 – Advanced placement mode</p></figcaption></figure></div>

### Option 1 – Directly via the map

1. Make sure that the menu **Map \[B]** is open
2. Activate the **Placement mode \[E]**\
   ▷ The sidebar **\[H]** switches to “Placement mode” (see Fig. 4)
3. Assets with the symbol **\[R]** have not been placed
4. Assets with the symbol **\[S]** have already been placed. Continue to change the placement.
5. Click on the symbol **\[R]** or **\[S]**, next to the asset you want to place.\
   ▷ The sidebar **\[H]** switches to “Advanced placement mode” (see Fig. 7)
6. Navigate in the map to the location where you want to place the asset
7. Click on the location on the map where the asset should be placed.\
   ▷ The selected location is marked with a particularly large map symbol “Asset” **\[L]** marked
8. Click on **Save \[T]**, to place the asset.
9. If the asset has already been placed: With **\[V]** you can remove the placement.

Click on a map symbol **\[X]** to go to the asset details

### Option 2 – Via the asset menu

1. [-> Create a new asset](/collection/english-v14/documentation/assets/assets-erstellen.md)[ or start editing an existing asset](/collection/english-v14/documentation/assets/assets-erstellen.md)
2. Click on \[X]\
   ▷ The map opens\
   ▷ Placement mode is activated automatically
3. If the asset to be placed is a floor: Activate the switch “Asset is a floor”
4. Navigate in the map to the location where you want to place the asset
5. Click on the location on the map where the asset should be placed.\
   ▷ The selected location is marked with a particularly large map symbol “Asset” **\[L]** marked
6. Click on **Save \[T]**, to place the asset.
7. If the asset has already been placed: With \[V] you can remove the placement.

## Set default map section

The default map section is the map section that is shown by default when the “Map” menu is opened.

### Change for your user

Proceed as follows to change the default map section for your own user:

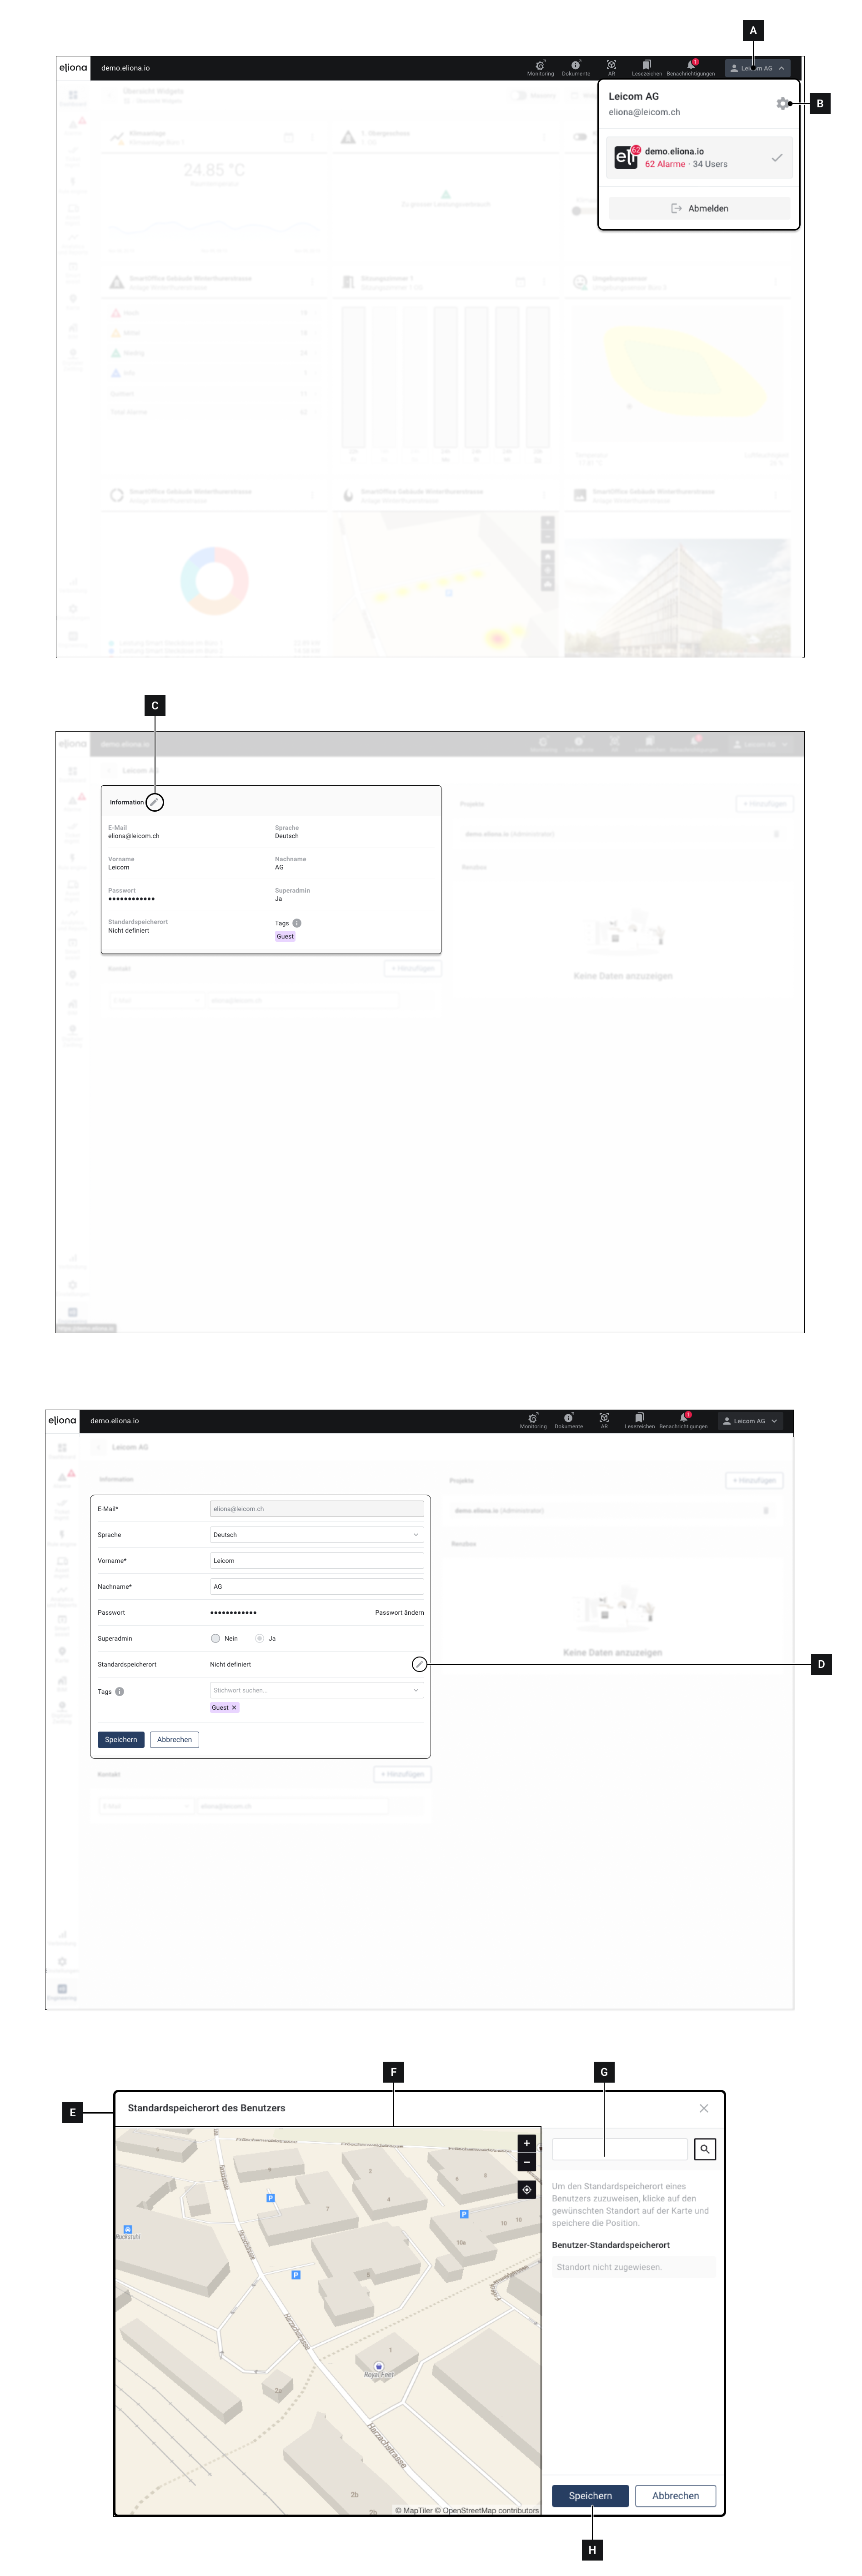
<figure><img src="https://content.gitbook.com/content/Nyvwhz1kEMXcHf4HLuZ8/blobs/cZf2o77sOVONXUyanvJX/Docs_Karte%20-%20Standardspeicherort.png" alt=""><figcaption></figcaption></figure>

1. Click your user name in the title bar **\[A]**
2. Click on **\[B]**\
   ▷ Your user settings open
3. Click on **\[C]**
4. Click on default location **\[D]**\
   ▷ A **map selection \[E]** opens
5. Navigate in **\[F]**, to the point you want to set as the default location.
6. Alternatively, you can search for **\[G]** a location
7. Click on **Save \[H]**\
   ▷ The default location has been adopted

{% hint style="info" %}
You must follow the procedure described to access your user settings.

It is not possible via *Engineering -> Users -> \[your user]* to change the default location.
{% endhint %}

{% hint style="info" %}
With this method you CANNOT change the default map section for other users.

If you want to configure a default map section for other users, use the function [-> Project roles](/collection/english-v14/documentation/rollen/projektrollen.md)
{% endhint %}

### Change via project role

If you want to set a default map section for other users, you can do this via the [-> Project role](/collection/english-v14/documentation/rollen/projektrollen.md) .


---

# Agent Instructions
This documentation is published with GitBook. GitBook is the documentation platform designed so that both humans and AI agents can read, navigate, and reason over technical content effectively. Learn more at gitbook.com.

## Querying This Documentation
If you need additional information that is not directly available in this page, you can query the documentation dynamically by asking a question.

Perform an HTTP GET request on the current page URL with the `ask` query parameter, and the optional `goal` query parameter:

```
GET https://docs.buildings.ability.abb/collection/english-v14/documentation/karte-und-stockwerk/karte.md?ask=<question>&goal=<endgoal>
```

`ask` is the immediate question: it should be specific, self-contained, and written in natural language.
`goal` is optional and describes the broader end goal you are ultimately trying to accomplish on behalf of the user. GitBook uses it to tailor the answer towards what is most useful for that goal.

The response will contain a direct answer to the question and relevant excerpts and sources from the documentation.

Use this mechanism when the answer is not explicitly present in the current page, you need clarification or additional context, or you want to retrieve related documentation sections.